Using a node graph to spawn a butterfly
Node graphs utilize a node-based workflow to help you create remarkable gameplay features easily and quickly. In this tutorial, we will explore how to use a node graph to create a butterfly flying out when a player approaches a bush.
Prerequisite
Visual Studio Code is installed and integrated with your Studio. If you haven't done this already, follow the instructions in How to start coding to download and integrate.
Adding models, a component, and a trigger box
Adding a bush and a butterfly
- Find a bush model and a butterfly model in Asset Library and add them to your assets. In our example, we added model BushBig_A for the bush, and model Butterfly Monarch for the butterfly.
- Place the two models into the scene by choosing Asset Box > Models. To adjust the model position, rotation, or scale, specify in the Transform pane or simply drag the model.
Note: The butterfly model can be placed anywhere in the scene. A copy of this model will spawn rather than the model itself, and the model's position has no effect on the spawn point.

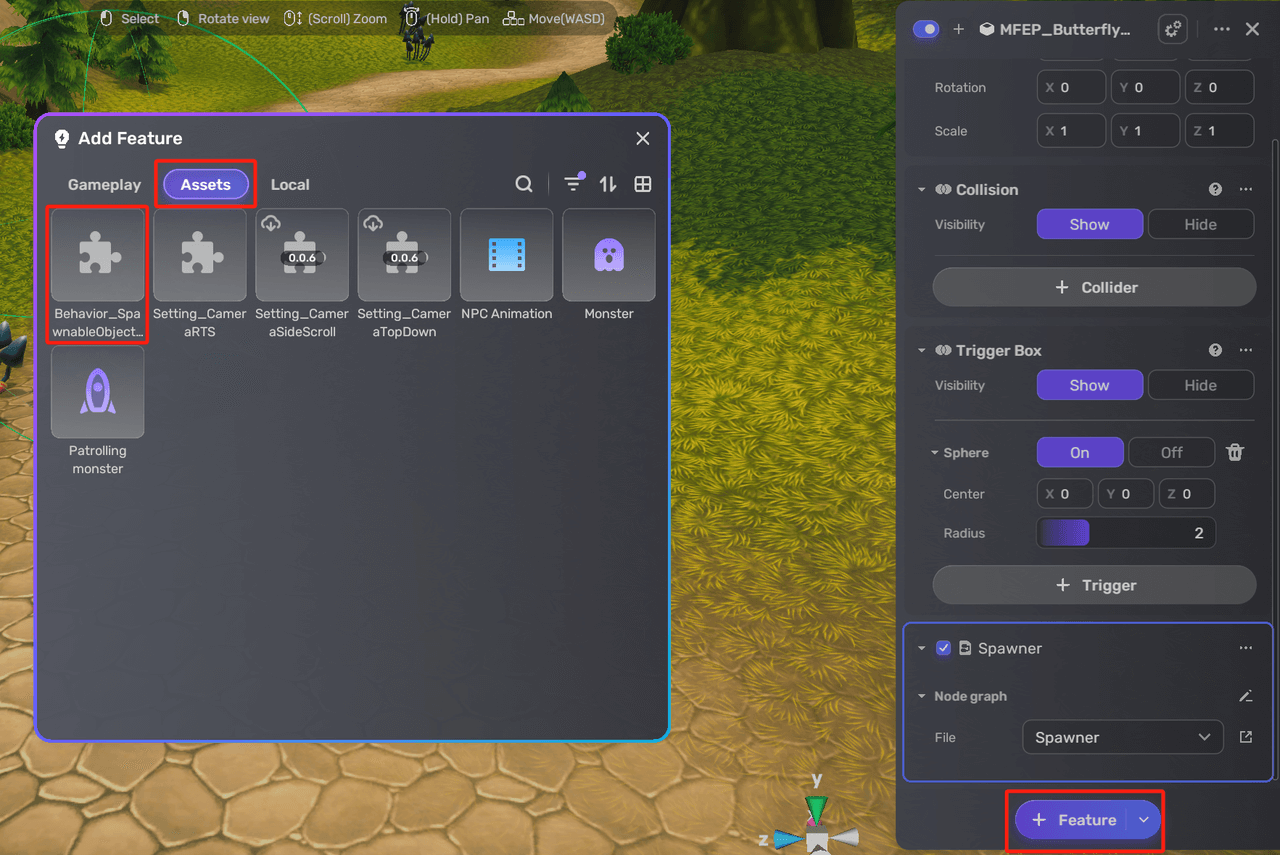
Adding a Behavior_SpawnableObjectMarker component to the butterfly
To make the butterfly fly out around the bush, we need to add a Behavior_SpawnableObjectMarker component to the butterfly. This component makes a specific object spawnable once attached to it.
-
Find the Behavior_SpawnableObjectMarker component in Asset Library and add it to your assets.
-
Choose the butterfly and open its Properties window by clicking the More icon.

-
Add the component to the butterfly by choosing + Feature > Assets > Behavior_SpawnableObjectMarker.
-
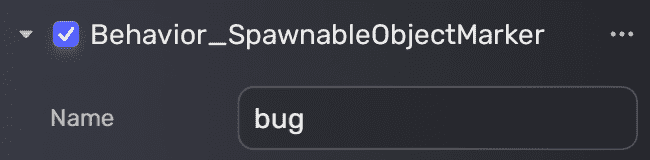
Give this component a name. In our example, we name it bug.


Adding a trigger box to the bush
To make a spawn event happen, choose the bush and add a trigger box to it by choosing + Trigger>Sphere. We also adjust the center and radius of the sphere trigger.

Creating a node graph
Attach a new graph file to bush by selecting the bush and choosing + Feature>Add node graph>+ New node graph. You can name it Spawner. For more details, see adding a node graph.

Then click 
Adding and connecting nodes
Setting the trigger and trigger condition
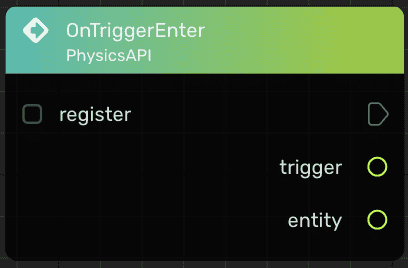
First of all, we need to set the bush as the trigger, and the trigger condition to be upon players entering the trigger box.
-
Click Add Node or right-click a blank space in the Editor to bring up the Add Node search box. Then type onTriggerEnter and select the first search result. Note that the second search result includes two entity parameters, which are not applicable in this case.
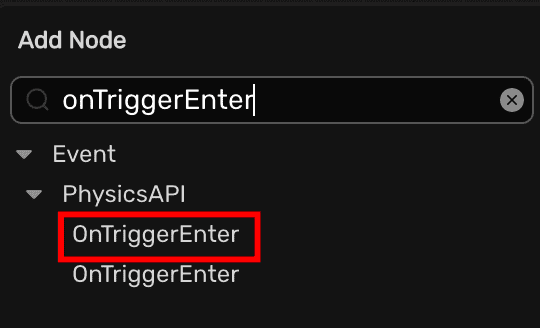
On the OnTriggerEnter node, trigger stands for the object with a trigger box while entity stands for the object entering the trigger box.
-
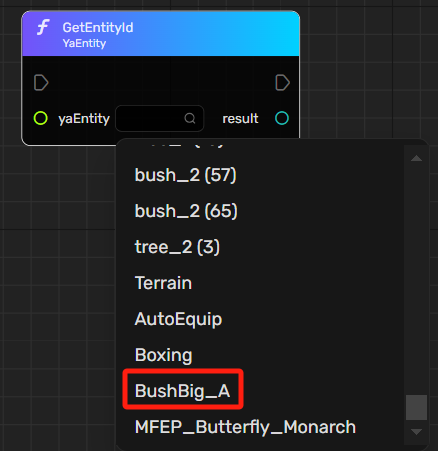
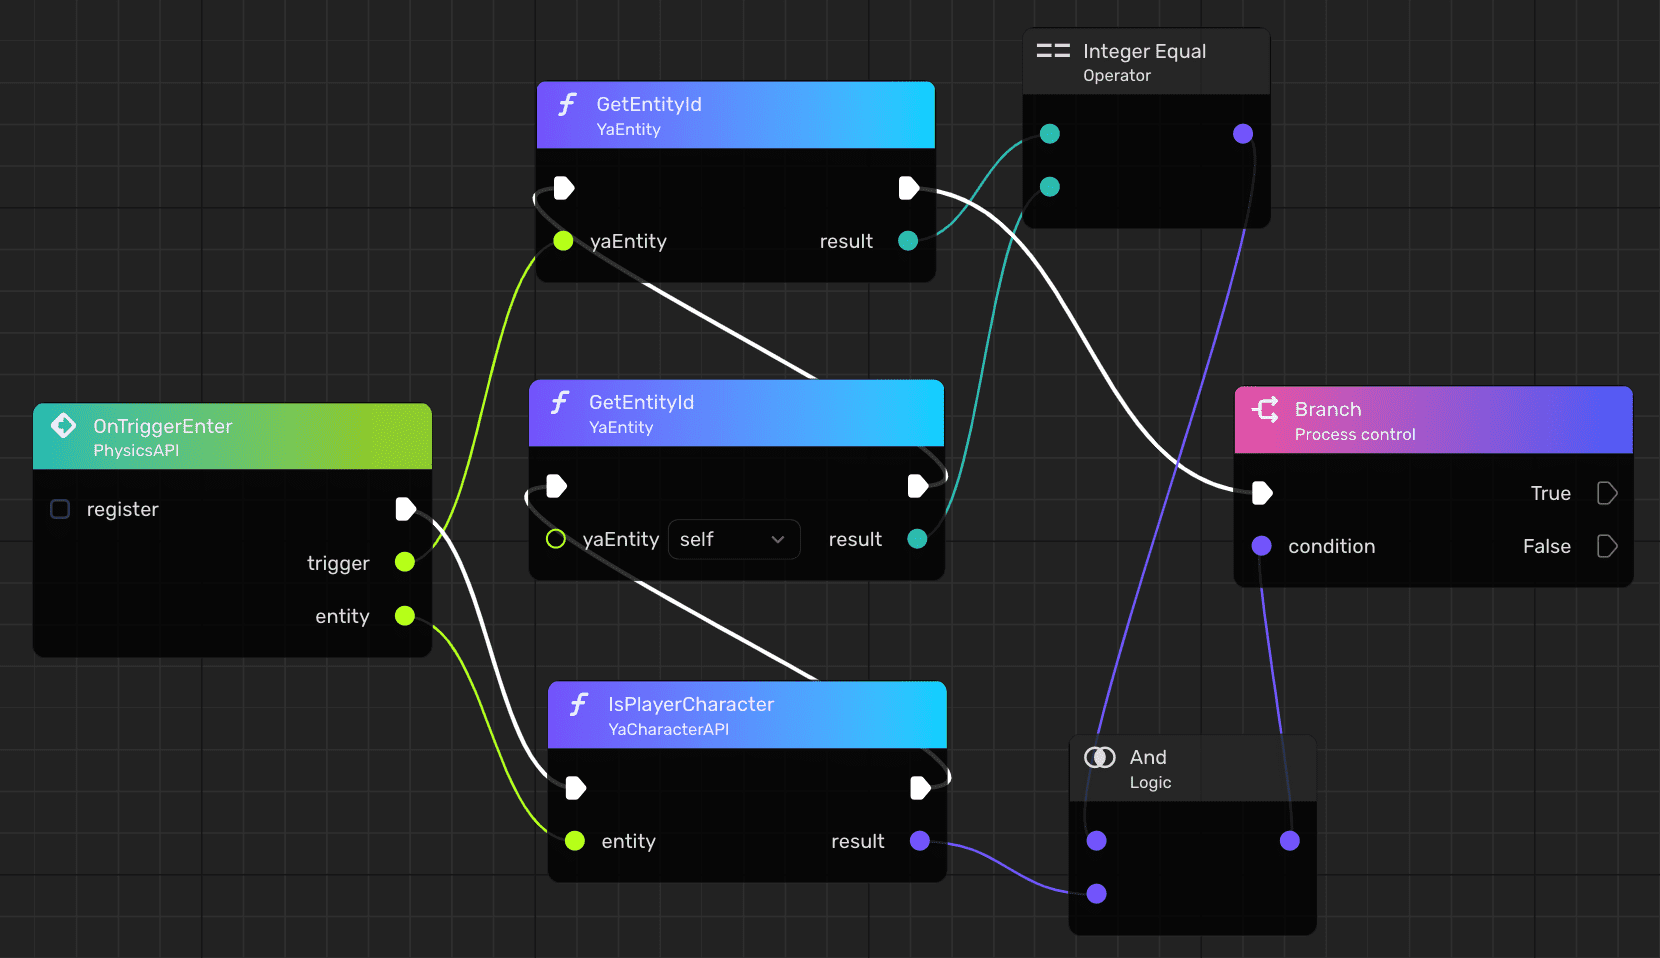
With this node an event will be triggered when any trigger box in the scene is entered. So we need to constrain it to be triggered only when a player gets close to the bush. Make sure the trigger is the bush itself by typing GetEntityId in the Add Node search box and filtering to locate BushBig_A as the entity.
-
Similarly we use GetEntityId to set self (the current object) as another entity. We also use Integer Equal to connect the two entities by drawing lines between nodes.

-
Let's move on to set the player entering the trigger box as the trigger condition by using IsPlayerCharacter, Branch, and And nodes.

-
Connect all nodes created so far as follows to complete setting up the trigger and the trigger condition (with white lines connecting the nodes to be executed):


Setting the object to spawn and the spawn position
To allow a butterfly to show up right above the bush when triggered, we need to set the butterfly as the object to spawn and the desired position for the butterfly to spawn.
-
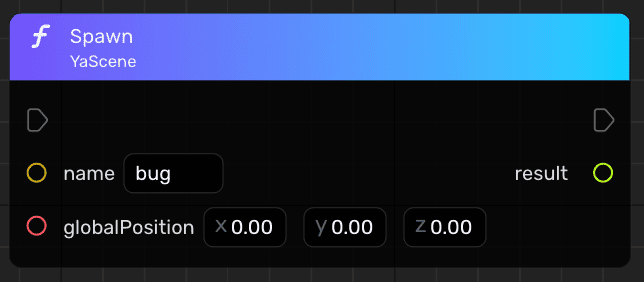
Choose the first Spawn node under YaScene with the global position variable. Then enter the name bug for the SpawnableObjectMarker component.
-
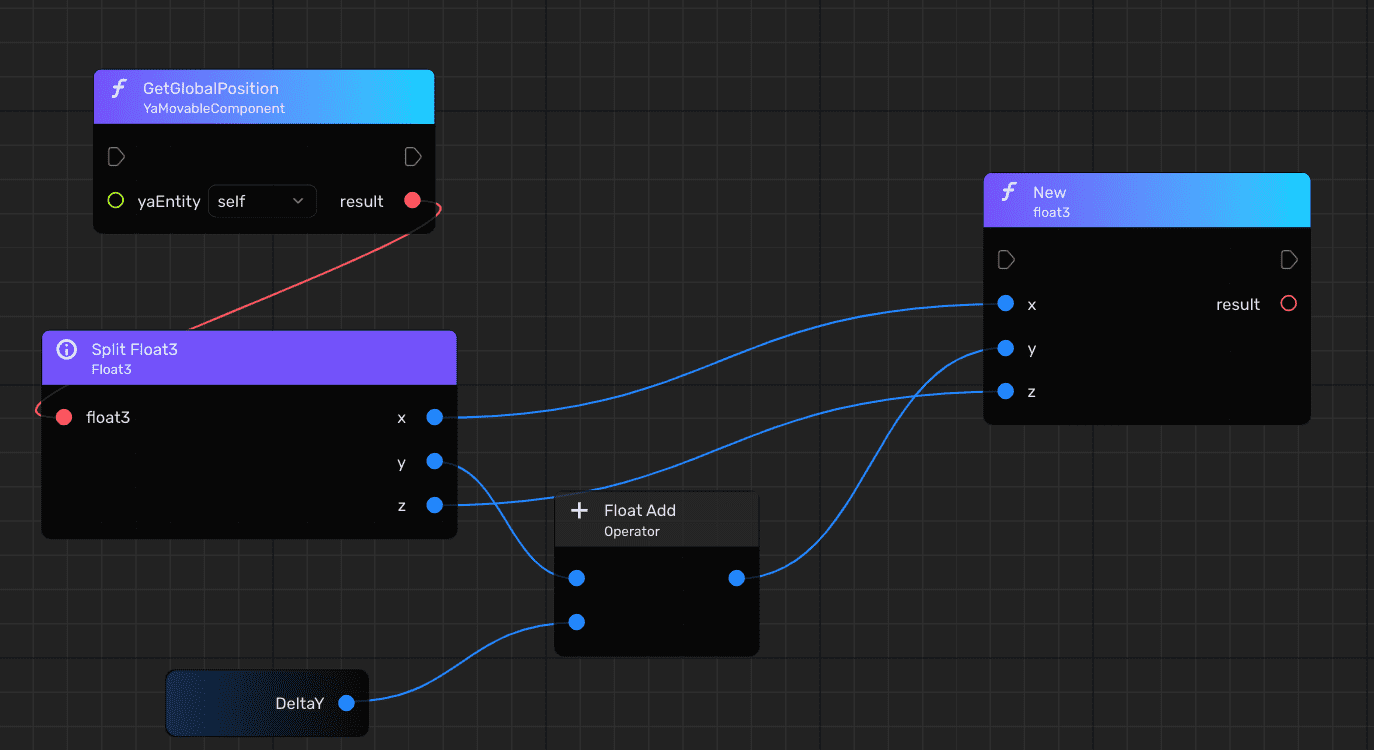
For the target spawn position of the butterfly, we can get the position of the bush and add an extra value to its Y-axis with splitting float3. Find GetGlobalPosition under YaMovableComponent and link its result to node Split Float3.

-
Then we continue to create a variable in the Node Management panel. After clicking the Add button in the Variables field, enter a name and choose the data type of this variable before clicking Done.
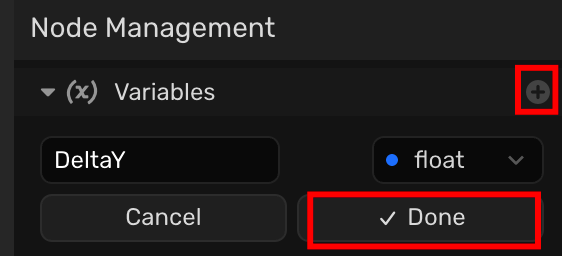
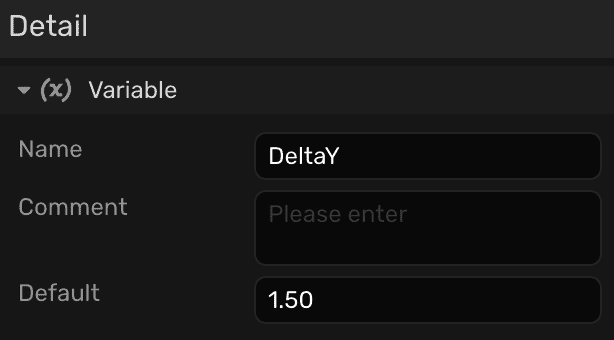
Click the variable you just created to open the Detail panel, and set a default value.
Thus, you can place the variable into the graph by dragging and choosing Get when dropping it.

-
To add the variable to Y-Axis to create a position for the butterfly to spawn in, and to save the new position as a float3 value, first add a New node under float3 and an operator node Float Add. Then connect these nodes:
-
Link the result of new float3 with globalPosition on node Spawn and this feature is all set:
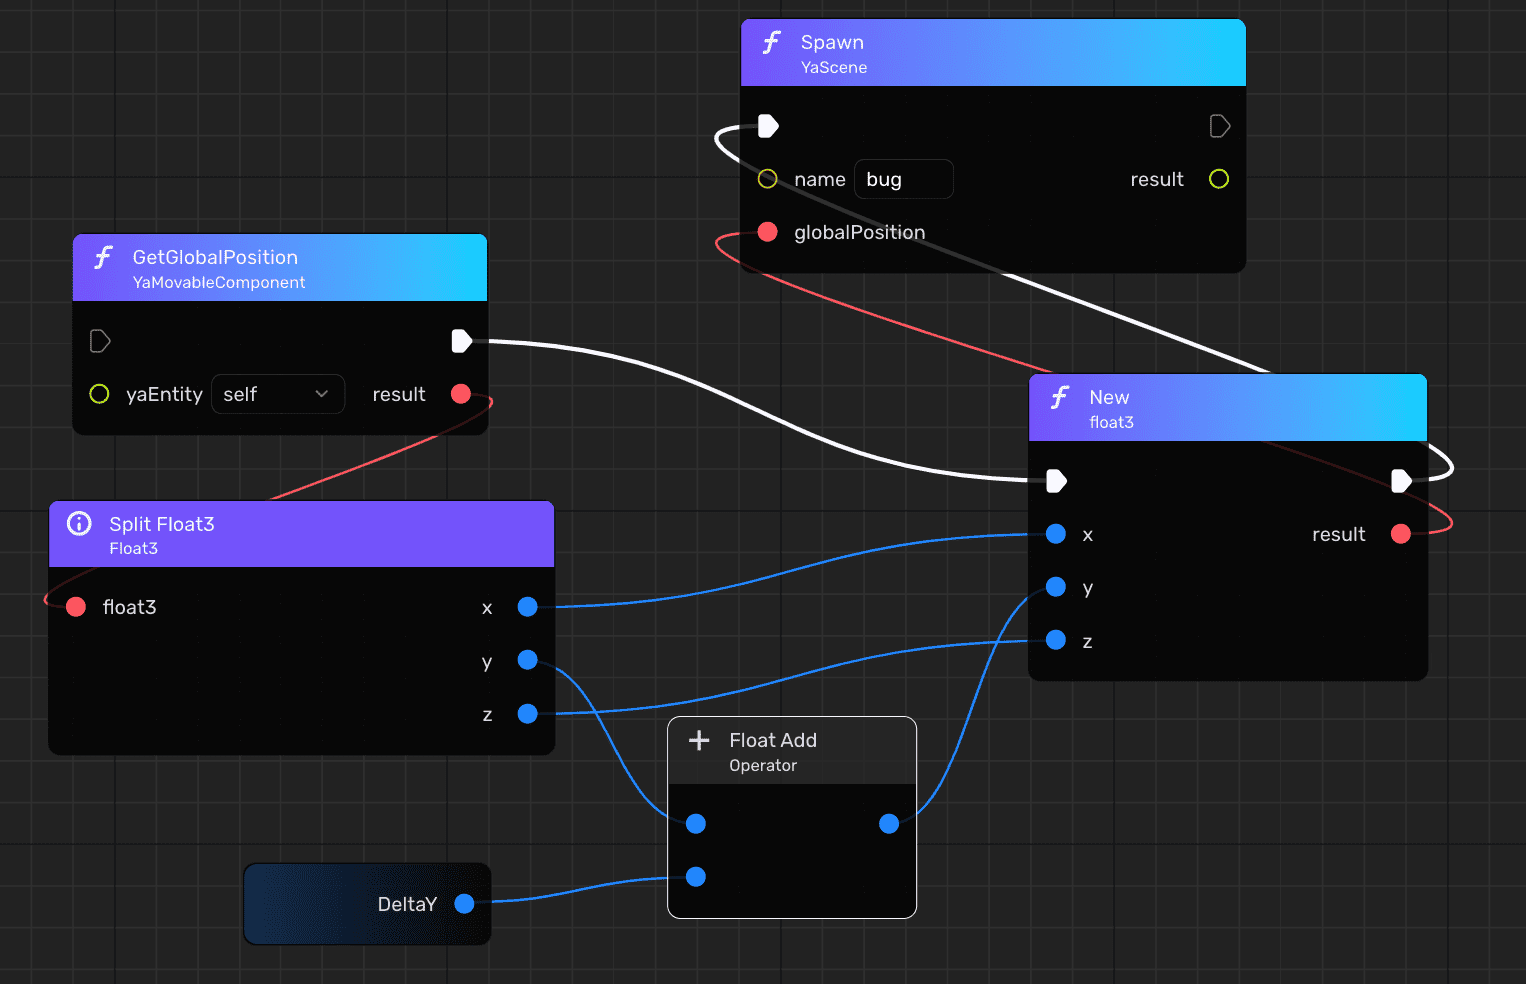


The whole node graph looks like this:

Saving the node graph
Before getting back to Studio, don't forget to save the node graph by clicking the following icon on the toolbar.

Note: A Lua file will be automatically generated when you save a node graph. For example, when you click the graph file name right above the toolbar, you can see a Lua file named Spawner.gen.lua. You can also modify this Lua file and use it directly if needed.

Go back to Studio, click 

Whenever a player gets close to the bush, the butterfly appears just above it. Hopefully, this tutorial has inspired you to try more features and unleash your creativity with node graphs.


