Introducing gameplay components
Inventory
Inventory is a place where you store and manage items in games.
Enabling/disabling Inventory
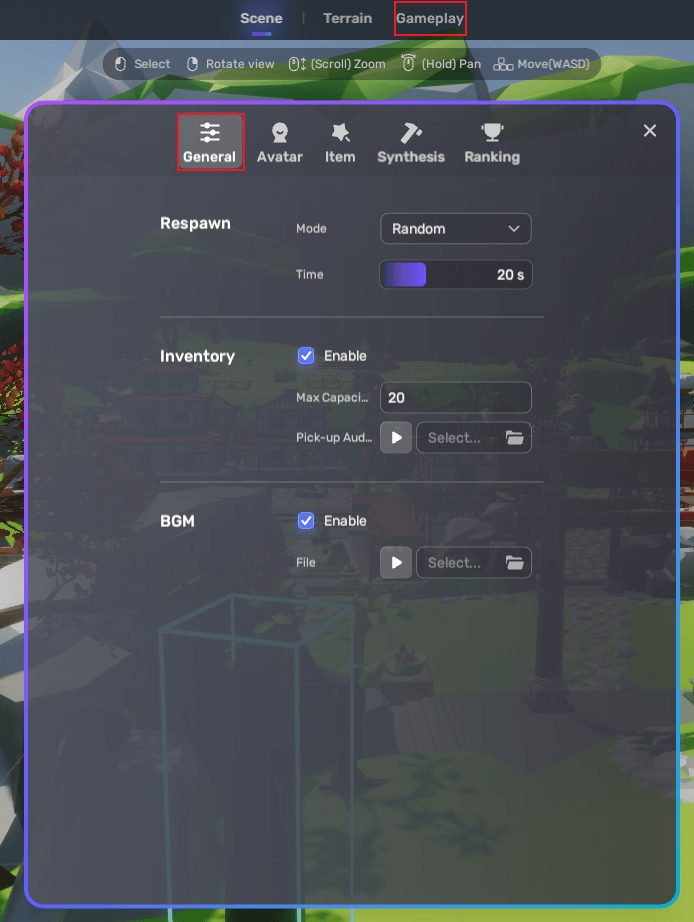
Inventory is enabled by default. To disable it, choose Gameplay>General>Inventory and untick the box of Enable.

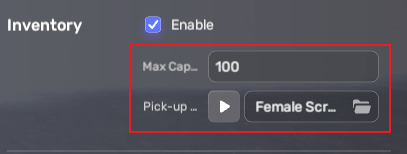
Configuring your Inventory
You can set the maximum capacity for your inventory, ranging from 20 to 100, and select the music clip that plays when you collect an item.
Throwing items out of your Inventory
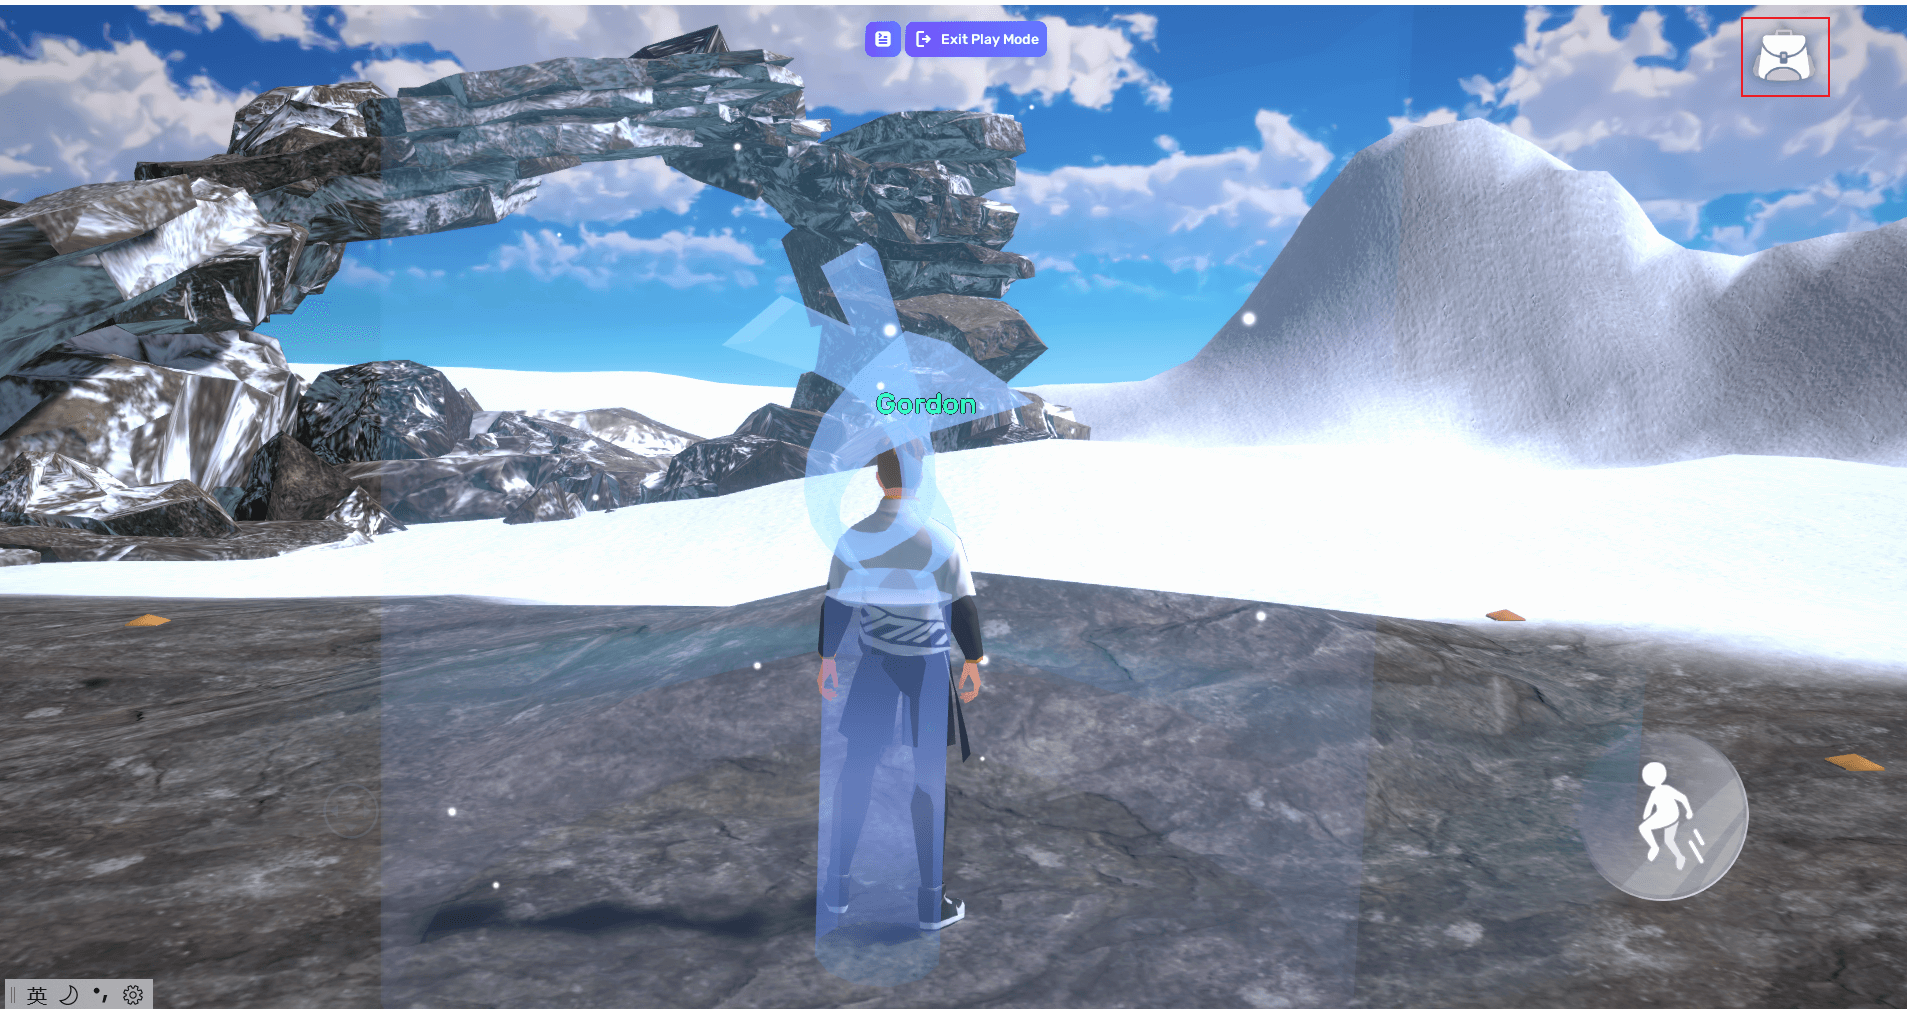
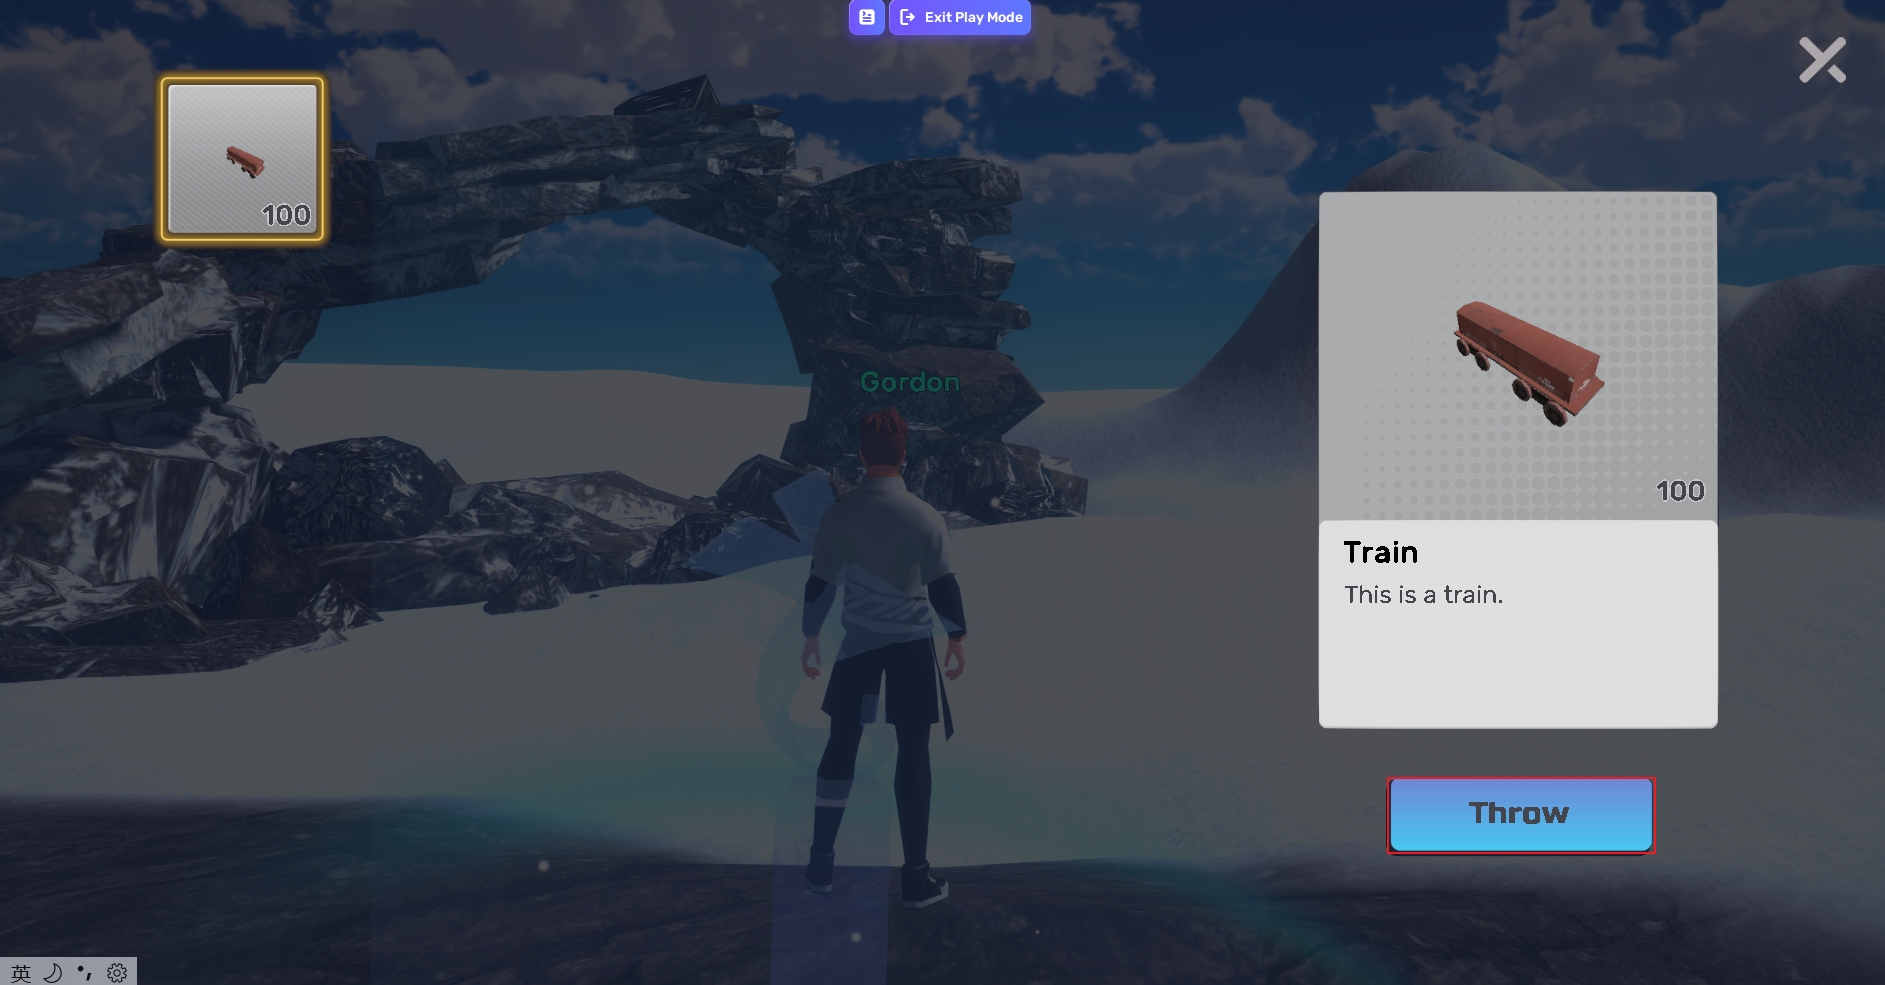
In Play mode, when the items you collected reach the maximum capacity, you can't collect items anymore. Sometimes throwing some items out of your inventory could be a choice. To throw items, choose the Inventory icon at the right top corner, choose Throw, and specify the number of items to throw.
Ranking
Ranking allows you to add a leaderboard to your games.
Enabling/disabling ranking
Ranking is disabled by default. If you want to enable it, choose Gameplay>Ranking>+New Ranking.

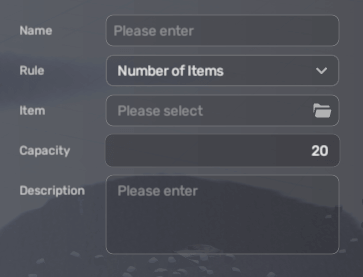
Configuring the leaderboard
You can set the following fields for your leaderboard.
| Field | Description |
|---|---|
| Name | A name for your leaderboard |
| Rule | Determines the metric used to arrange the ranking.
|
| Item | Specifies the item used in the ranking. It works only when you choose Number of items or Obtain time of items for your rule. |
| Capacity | Determines the length of the ranking. |
| Description | Introduces the leaderboard to your players. |
Respawning
Respawning is the process of a player reappearing in the game after dying.
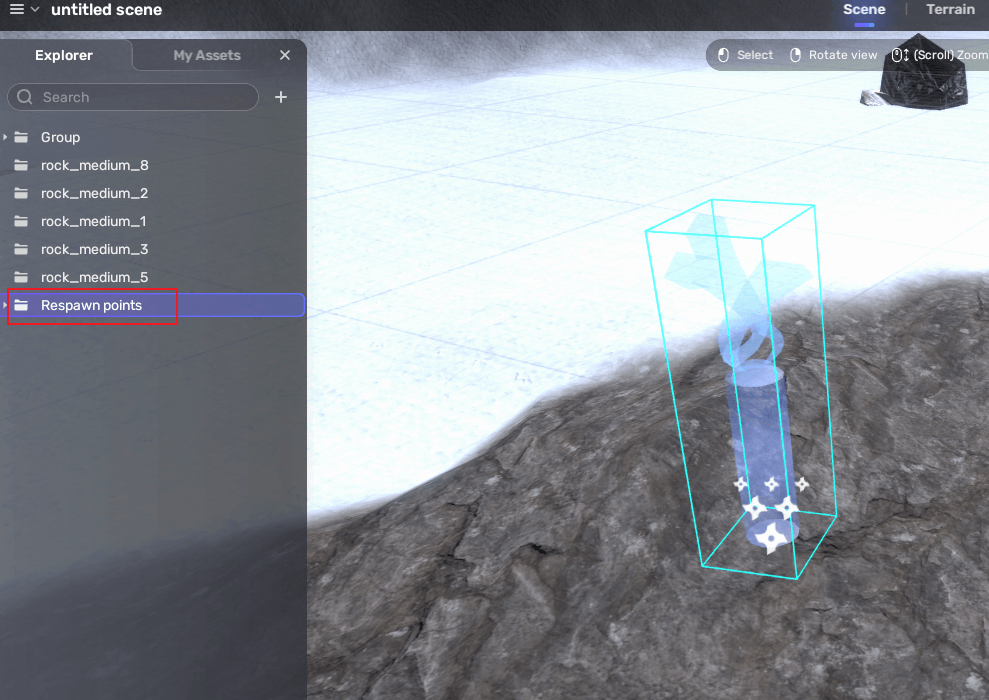
Finding your spawn point
YAHAHA provides you with a spawn point where your players spawn the first time they enter into your game. The spawn point can be moved, but it can never be deleted. To find the spawn point, go to Explorer and choose Respawn points.
Note: Your avatar always spawns at the default spawn point when you switch from Edit mode to Play mode.
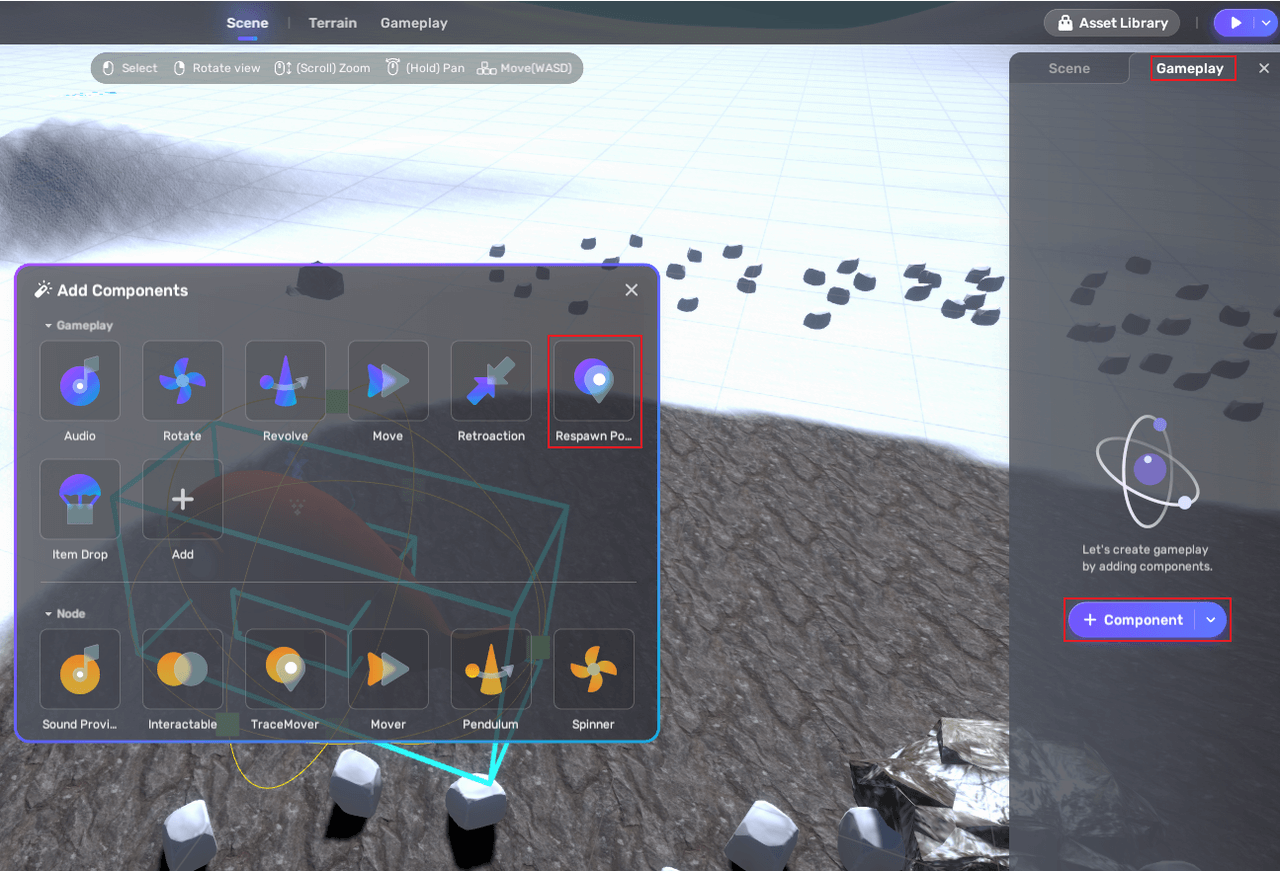
Adding respawn points
You can add respawn points to let your players spawn after dying. To add respawn points, select the object you want to attach the respawn point to, choose more>Gameplay>Respawn Point.
Configuring your respawn point
When you have several respawn points, you can specify one of the following rules to determine the next repawn point after dying:
- Default, the next respawn point is always the one that YAHAHA provides
- Random, the next respawn point is chosen randomly among all respawn points, including the one that YAHAHA provides.
- Nearest, the next respawn point is the one that is closest to the point where the player dies.
Item
Items are game assets that you can use to decorate the scene and interact with players.
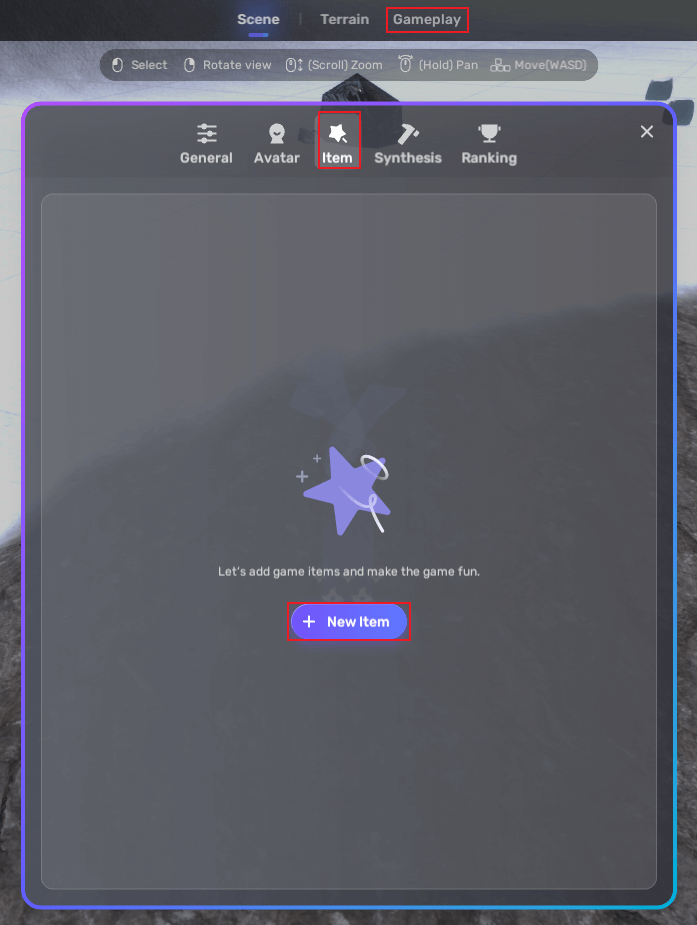
Creating an item
To create an item:
-
choose Gameplay>Item>New Item.
-
Populate the following fields.
Field Description Name The name of the item ID A unique identifier for the item Model The model for the item. These models are what you purchased from Asset Library. Description Briefly introduces the item.
Managing items
When you have too many items, you can search for your items with keywords. You can also sort your items by the data of creation or alphabetically.

When you don't need an item anymore, you can select it and delete it.

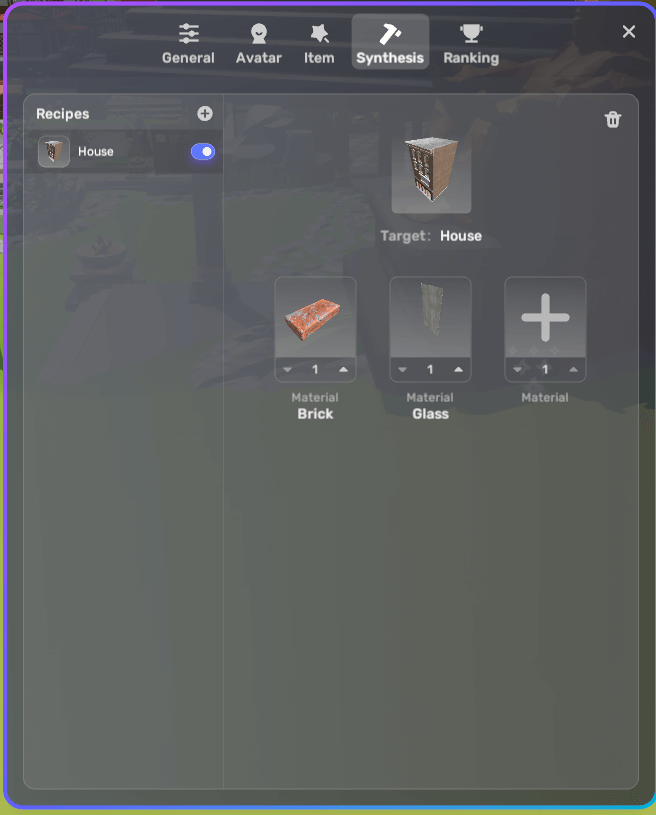
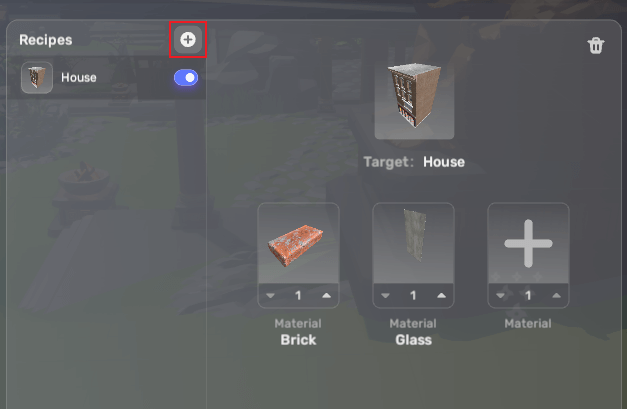
Synthesizing items
You can create recipes in your space so that your players can synthesize items from materials.
-
Choose Gameplay>Synthesis.
-
Create a new recipe by choosing +New Recipe.

-
Select a Target from your your items. Create one if you don't have any items yet.
-
Select Materials from your items.
-
Add more recipes by choosing the plus icon.
-
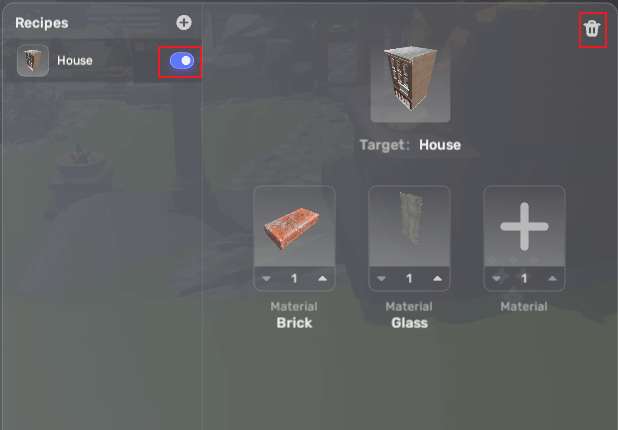
If you don't need the recipe for now, you can toggle it off so your players won't be able to synthesize items from the recipe. You can also delete it if you are sure the recipe is not needed any more.
Audio
Your space is more interesting and immersive with music and sound effects.
Setting up background music(BGM)
BGM is the music you can hear when you switch to Play mode and it can be heard wherever you go in the scene. BGM is enabled by default in YAHAHA Studio, but you need to specify the audio clip to make it work, as follows:
-
Find BGM by choosing Gameplay>General.
-
Select an audio clip as your BGM.
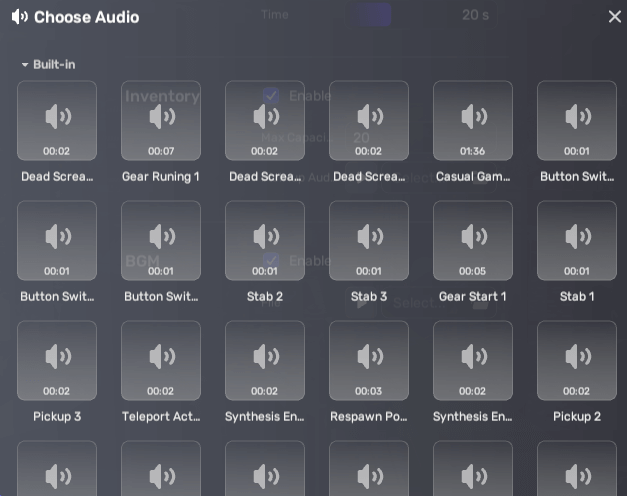
Adding audio clips to an object
To attach audio clips to an object:
-
Select the object and view its properties by choosing the More icon.
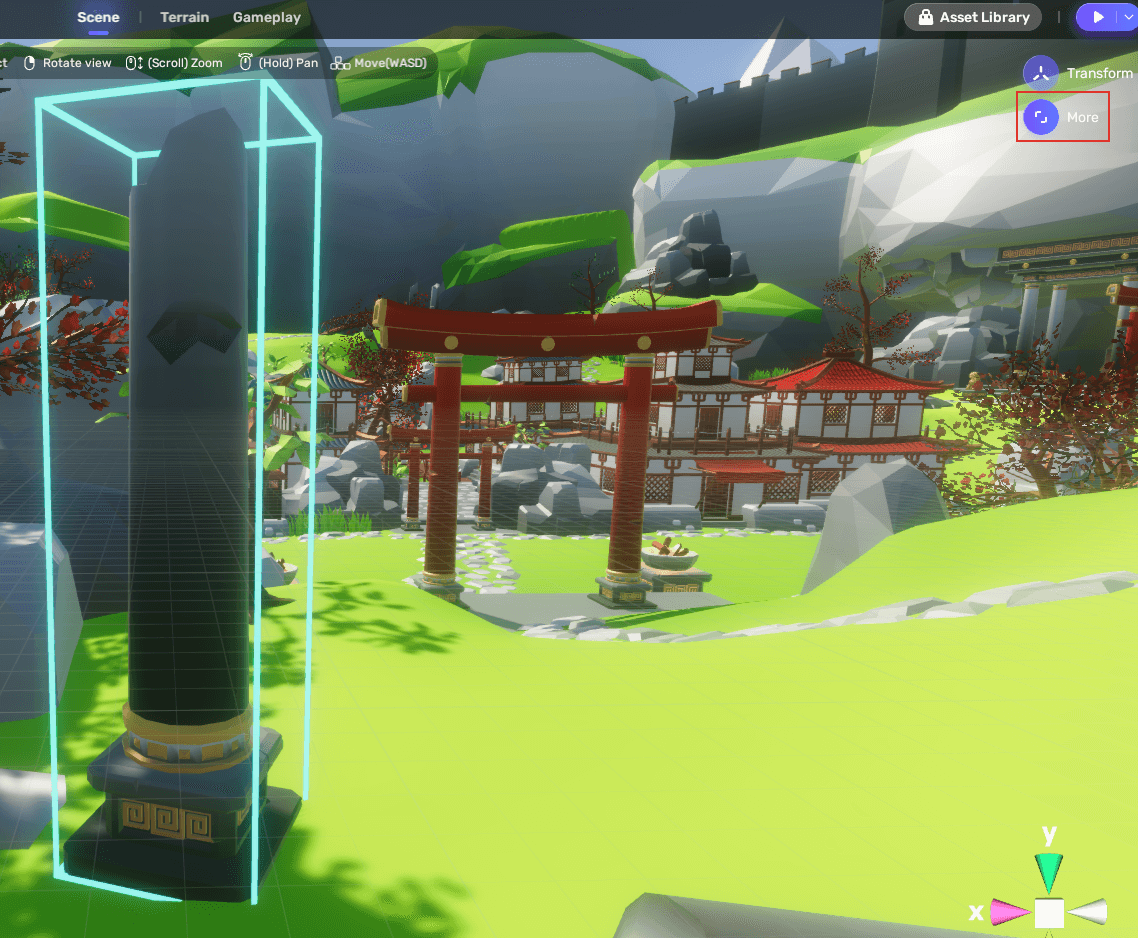
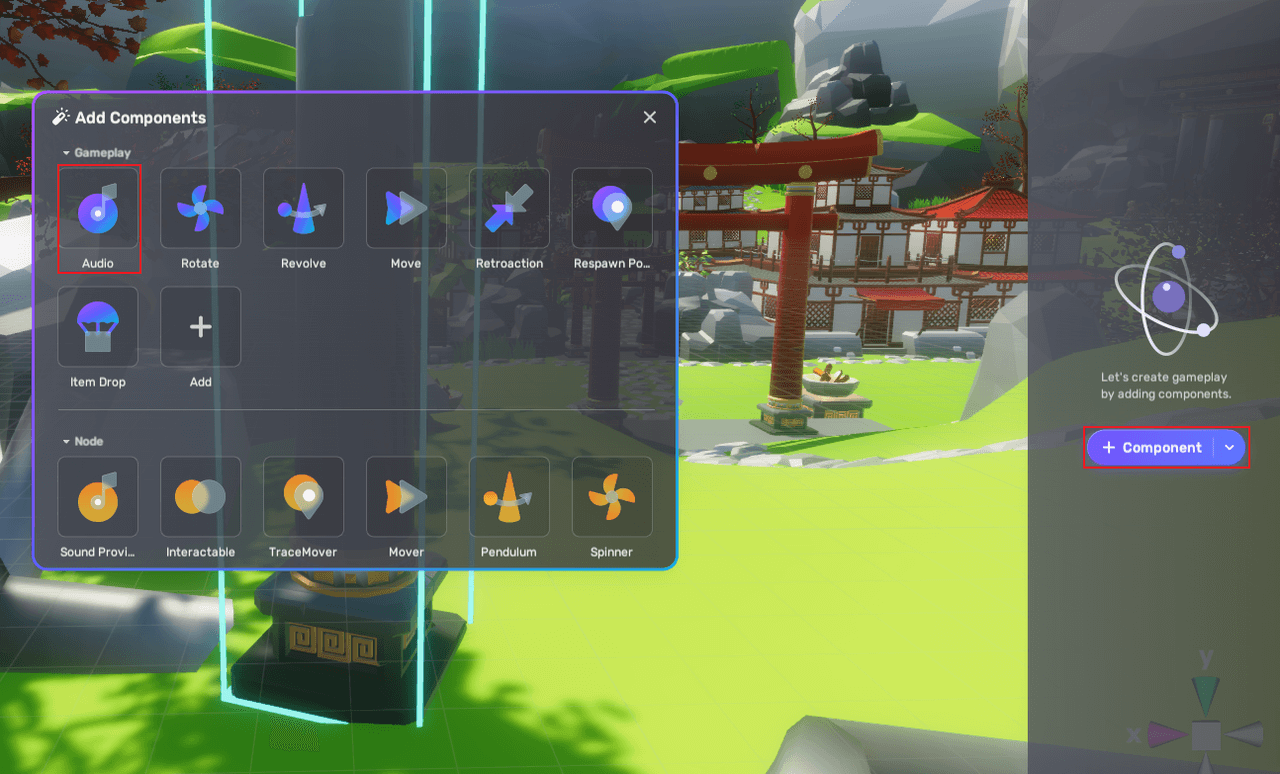
-
In the Gameplay tab, choose +Component>Audio to add the Audio component.
-
Add audio to the component. You can add multiple audio clips.
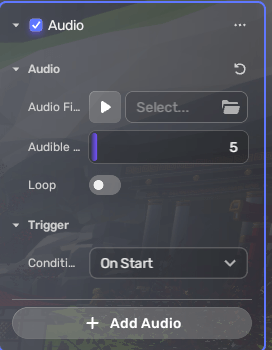
Field Description Audio file The file of the audio to add Audible range The range in which the audio can be heard. The range is a circle with the radius ranging from 1 to 100 meters. Loop Determines whether the audio plays in loop mode. Trigger Determines the trigger of the audio. - On start, the audio plays as soon as you switch to Play mode
- On trigger, the audio plays when the player touches the object
Mechanics
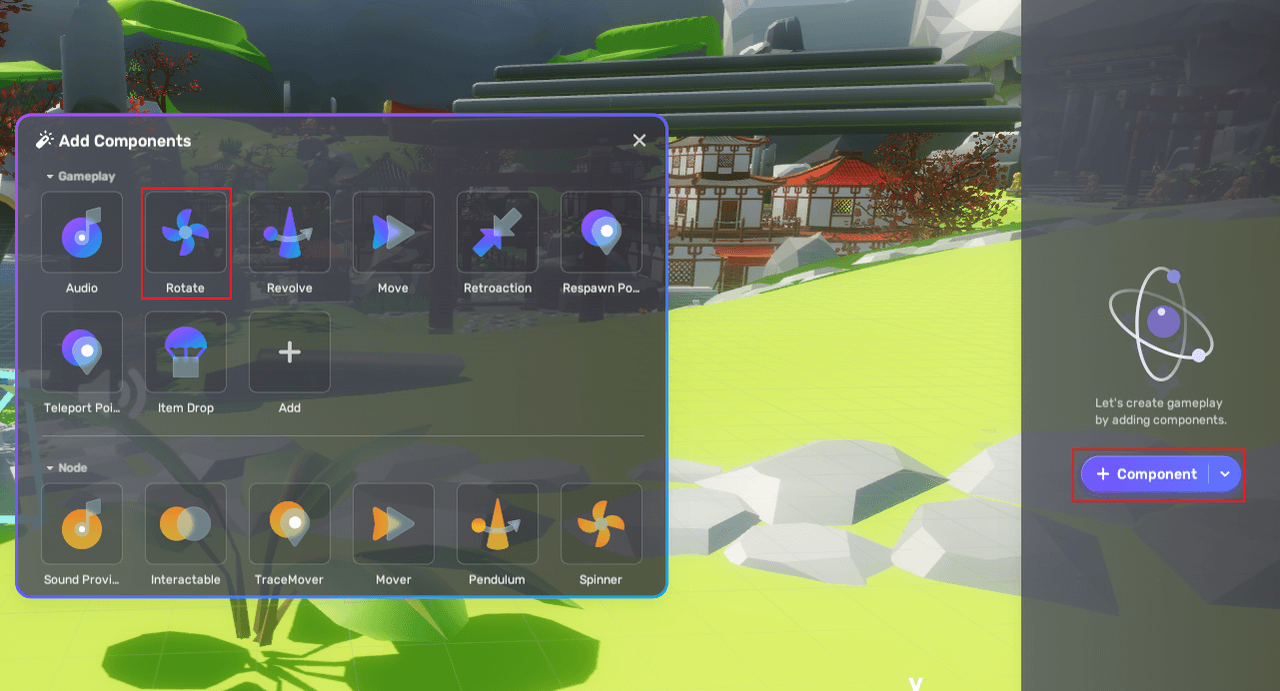
YAHAHA Studio allows you to add mechanics, such as rotate, revolve, move and retroact, to your game by adding and configuring gameplay components.
Adding mechanics gameplay components to your objects
-
Select the object and view its properties by choosing the More icon.
-
In the Gameplay tab, choose +Component and you can add the Rotate/Revolve/Move/Retroaction component.
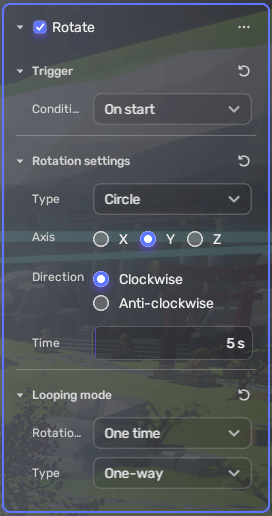
Rotate
The Rotate component makes an object move in a circle around the axis of rotation.
| Field | Description |
|---|---|
| Condition | Determines the trigger of rotation.
|
| Rotation Type | Determines the type of rotation, either Circle or Arc. Specify the angle if you choose Arc. |
| Axis | Determines the axis of rotation. |
| Direction | Determines the direction of the circular movement. |
| Time | Time to finish a circle or an arc in second. |
| Rotation NO | Specifies the number of rotation. |
| Loop type | Determines the loop type, either One-way or Two-way. If you choose One-way, the object rotates in the same direction. If you choose Two-way, the rotation direction changes to the opposite whenever the previous circle/arc movement finishes. |
Revolve
The Revolve component makes an object move in a circle around a central axis.
| Field | Description |
|---|---|
| Condition | Determines the trigger of revolve.
|
| Revolving Type | Determines the type of revolve, either Circle or Arc. Specify the angle if you choose Arc. |
| Rotate point | The central point of revolve |
| Axis | The central axis of revolve |
| Direction | Determines the direction of the circular movement. |
| Time | Time to finish a circle or an arc in second. |
| Rotation NO | Specifies the number of revolving. |
| Loop type | Determines the loop type, either One-way or Two-way. If you choose One-way, the object revolves in the same direction. If you choose Two-way, the revolving direction changes to the opposite whenever the previous revolve finishes. |

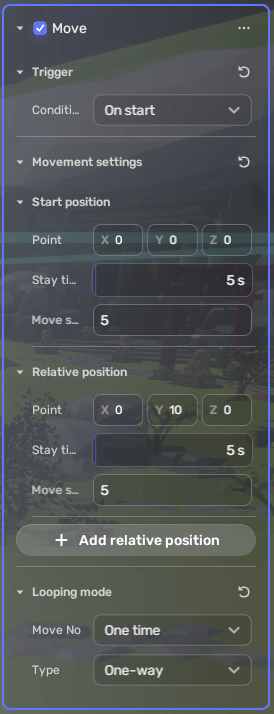
Move
The Move component makes an object move along specified positions in the scene.
| Field | Description |
|---|---|
| Trigger Condition | Determines the trigger of movement.
|
| Start/Relative position | Specifies the position for the object to start off.
|
| Move NO | Specifies the number of movement. |
| Loop type | Determines the loop type, either One-way or Two-way. If you choose One-way, the object always moves in the same direction. If you choose Two-way, the movement direction changes to the opposite whenever the previous movement finishes. |
Retroaction
The Retroaction component makes an object act an force on the player who touches it and cause some effects.
| Field | Description |
|---|---|
| Type | Determines the effect type of retroaction:
|
| Degree | Determines the degree of pushing the player away. |

Trigger
After gameplay components have been added to an object, they still need good timing to work. The Trigger component lets you attach a trigger for gameplay components and specify the conditions.
Note: You can add Trigger to any gameplay component. The following instructions take Rotate as an example.
Setting rotation triggered by the current object
-
Select an object in your scene and add the Rotate component to it.
-
By default, a trigger is attached to the component. If you want to add more triggers, choose + Add trigger on the component panel.
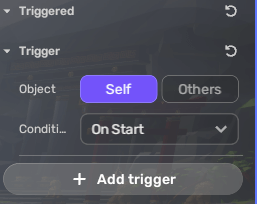
-
Choose a trigger object. By default, the trigger object is Self. Now the gameplay component is triggered by the current object itself.
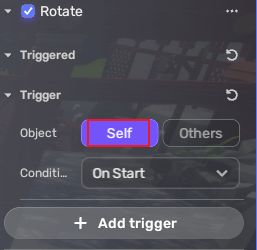
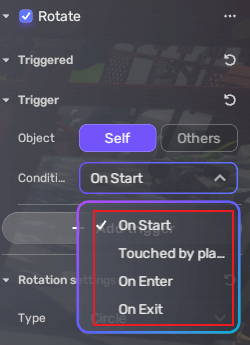
-
Choose the condition for the trigger.
- On start, triggered when you switch to Play mode.
- Touched by player, triggered when the object is touched by the player.
- On enter, triggered when the player enters the area in which the object is located.
- On exit, triggered when the player exits the area in which the object is located.
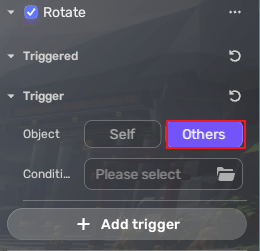
Setting rotation triggered by another object
-
Select an object in your scene and add the Rotate component to it.
-
By default, a trigger is attached to the component. If you want to add more triggers, choose + Add trigger on the component panel.
-
Choose Others as the trigger object. When Others is selected, the gameplay component is triggered by another object.
-
Select the object.
-
Choose the condition for the trigger.
- On start, triggered when you switch to Play mode.
- Touched by player, triggered when the object is touched by the player.
- On enter, triggered when the player enters the area in which the object is located.
- On exit, triggered when the player exits the area in which the object is located.
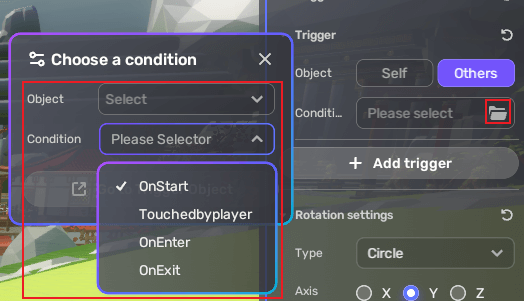
-
View the trigger object.
Teleport
Your players can be teleported to anywhere in the scene. To set the teleport point and the destination point:
-
Select the object that you want to set as a transport point in your scene.
-
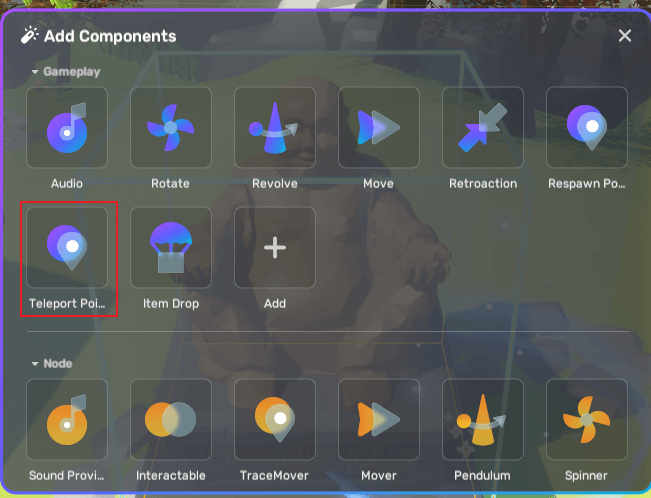
Go to the inspector of the object and choose +Component in the Gameplay tab.
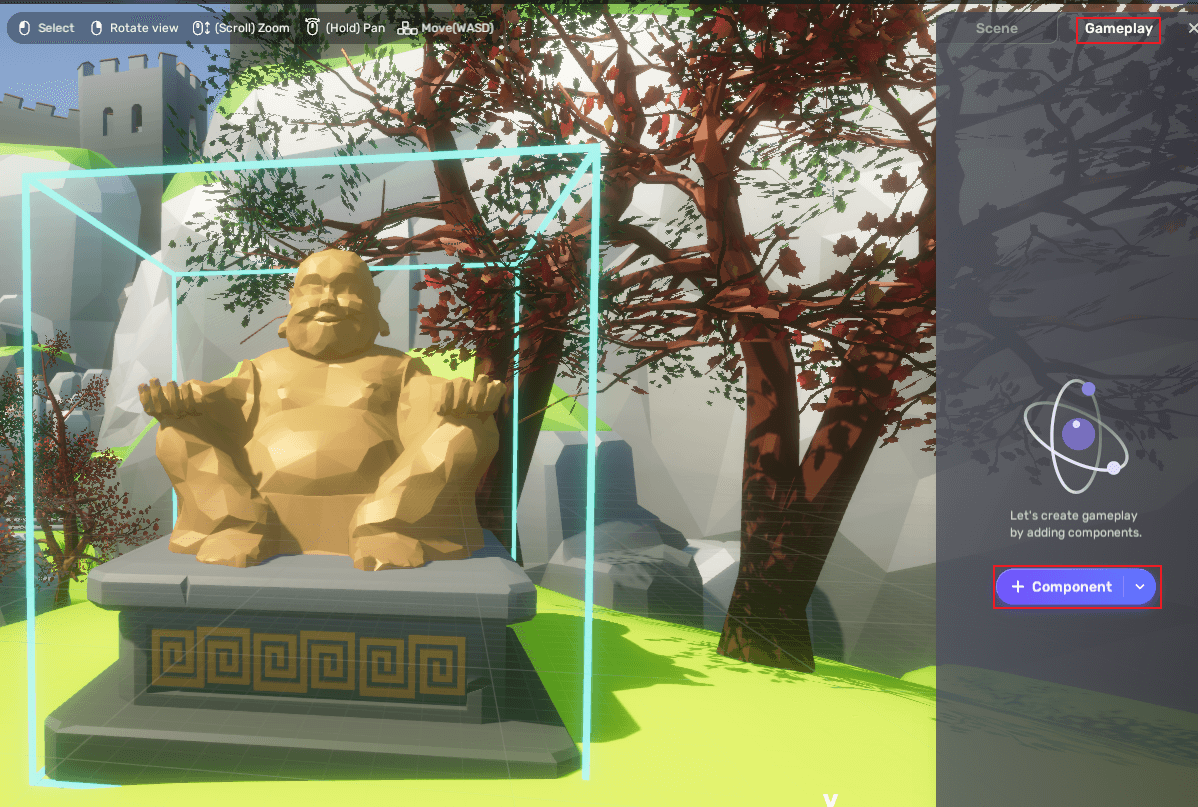
-
Add a teleport point to the object by choosing the Teleport Point component.
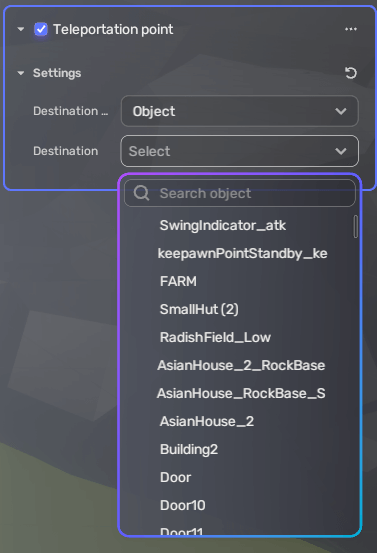
-
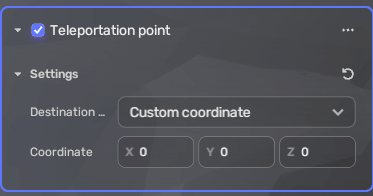
Set the teleport destination. It can be either be an object or coordinates of a point. If you choose Object, specify the object you would like to teleport to.
If you choose Custom coordinate, specify the coordinates of the point.
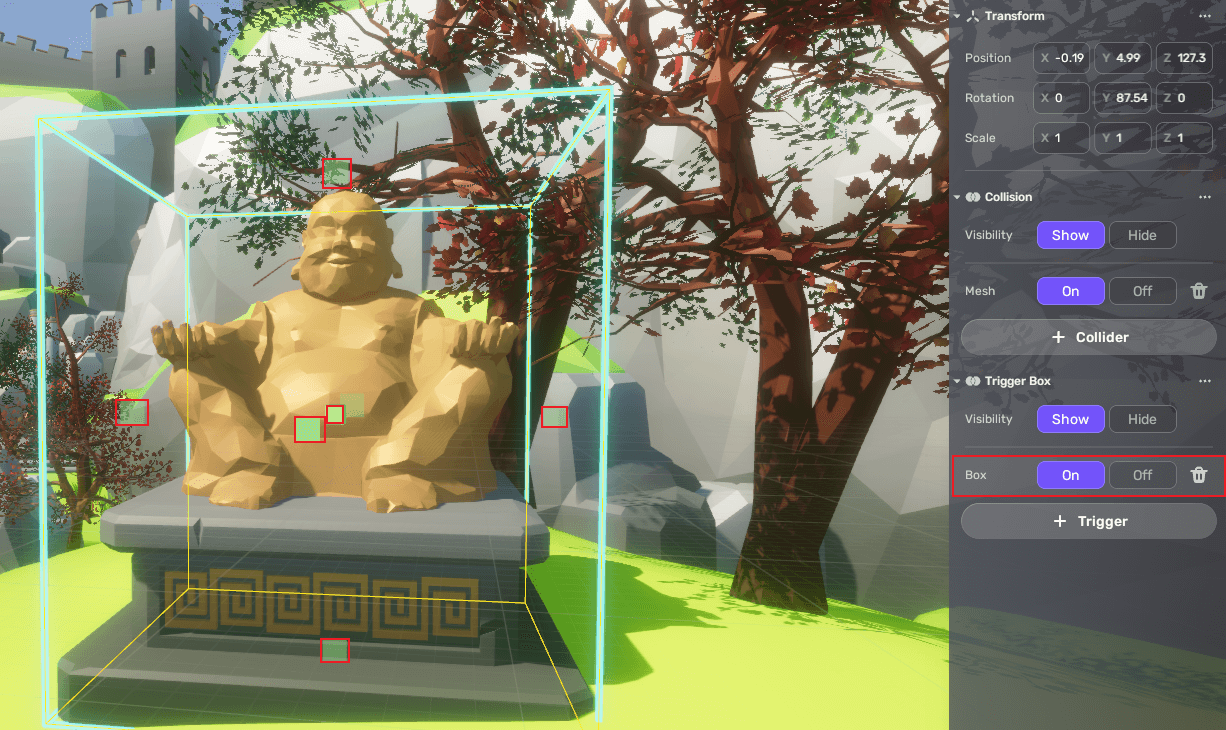
-
Add a trigger box for the teleport point in the Scene tab. The shape of a trigger box can be a sphere, a box, or a capsule.
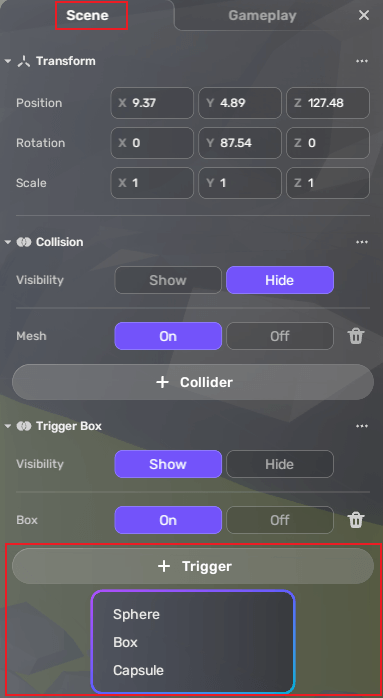
-
Adjust the size of the trigger box so that players will be able to touch it. Your players will be teleported to the destination only when they touch the trigger box. When you select the box, you will be shown points on the trigger box by which you can adjust the box shape.
Note: In Play mode, you will be teleported to the destination 3 seconds after you touch the trigger box.
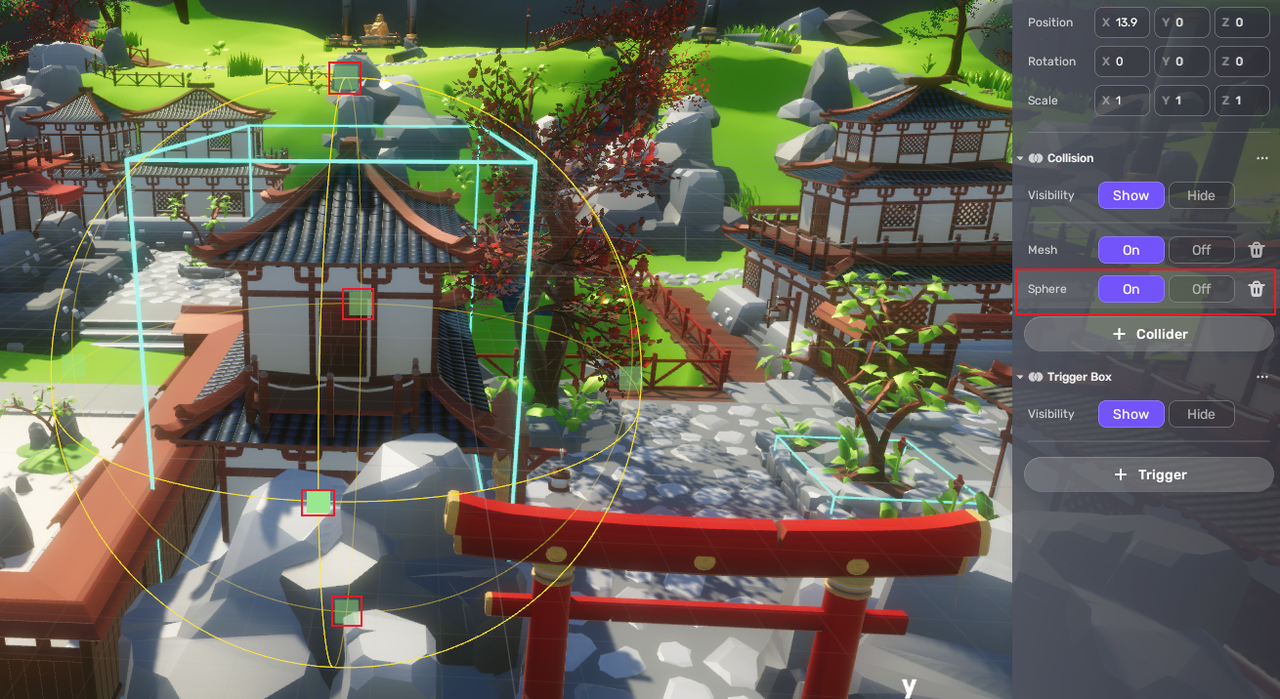
Collision
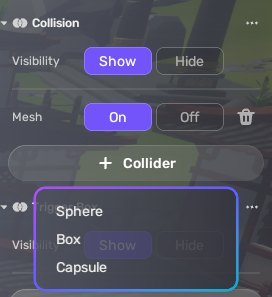
YAHAHA manages collision between objects using colliders. Currently YAHAHA Studio provides three collider shapes: sphere, box, and capsule.
Adding colliders
You can add colliders that suit your object by choosing + Collider and your collider shape.
Showing or hiding the colliders
You can decide whether to show or hide the colliders by specifying their visibility, either Show or Hide.
Adjusting the shape of the collider
- Choose your collider and you will see points on the shape.
- Drag the points to adjust the shape.