Create a multiplayer game with Party Game Kit
This tutorial is intended for Party Game Kit users.
Yahaha is a low-code, user-generated content (UGC) platform that helps creators to build, edit, and share 3D interactive experiences. In this tutorial, you'll use Party Game Kit to create a 3D, multiplayer exploration project and learn the basics of our editor. Follow along to learn the basics of our editor, including how to add assets, create dialogues, adjust the skybox, and share your project. Once complete, you can play your adventure game with friends and explore the world together.
To learn more about Party Game Kit and how it differs from Horror Game Kit, see FAQ.
Time to complete
20-30 minutes
What you'll learn
- Create a new project
- Key areas of Studio interface
- Add assets to an existing project
- Create an NPC and attach a dialogue to it
- Control environmental lighting and effects with the Environment system
- Playtest a project
- Save a project
- Publish a project
Before getting started
Create a Yahaha account
- Visit our Sign up page to create a YAHAHA account.
You must be at least 16 years old to have a YAHAHA account.
- Check your email for a verification code.
- Enter the code on the Sign up page to complete your account verification.
Download and install the Yahaha Installer
- Go to our Download page and click Download for MacOS or Download for Windows to download the installer.
- Once the download finishes, open the
YahahaInstaller.msifile to install. - Click the Yahaha icon from your Desktop to open Yahaha.
Create a new project
-
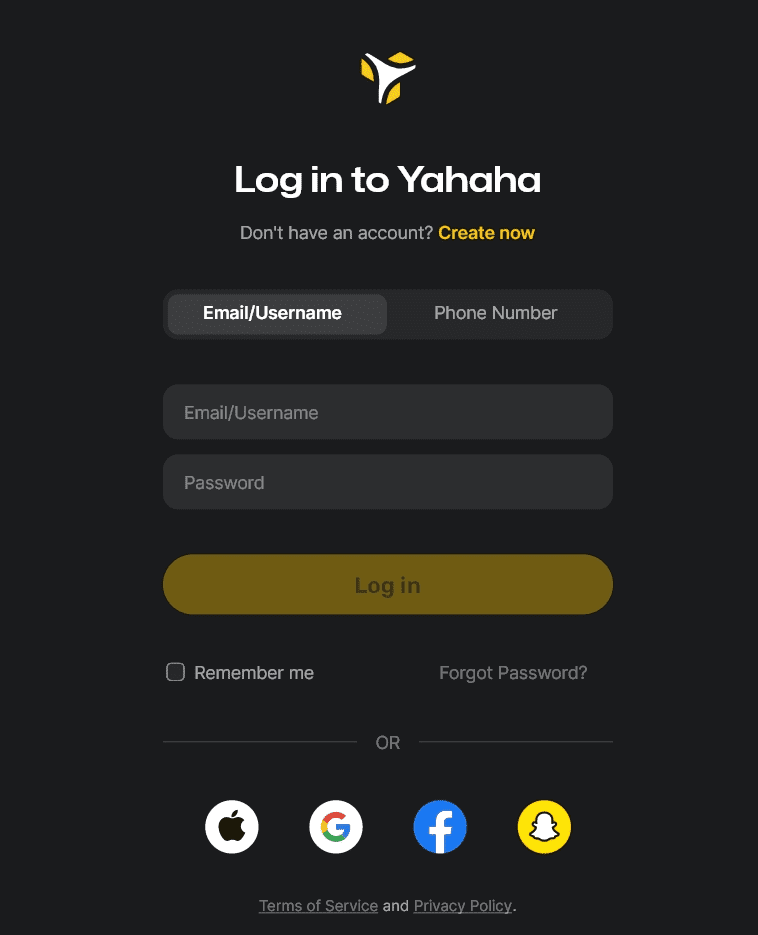
Sign in to Yahaha with your Yahaha account. You'll enter YAHAHA Desktop (Desktop), a hub to manage your project or play all Yahaha games.
-
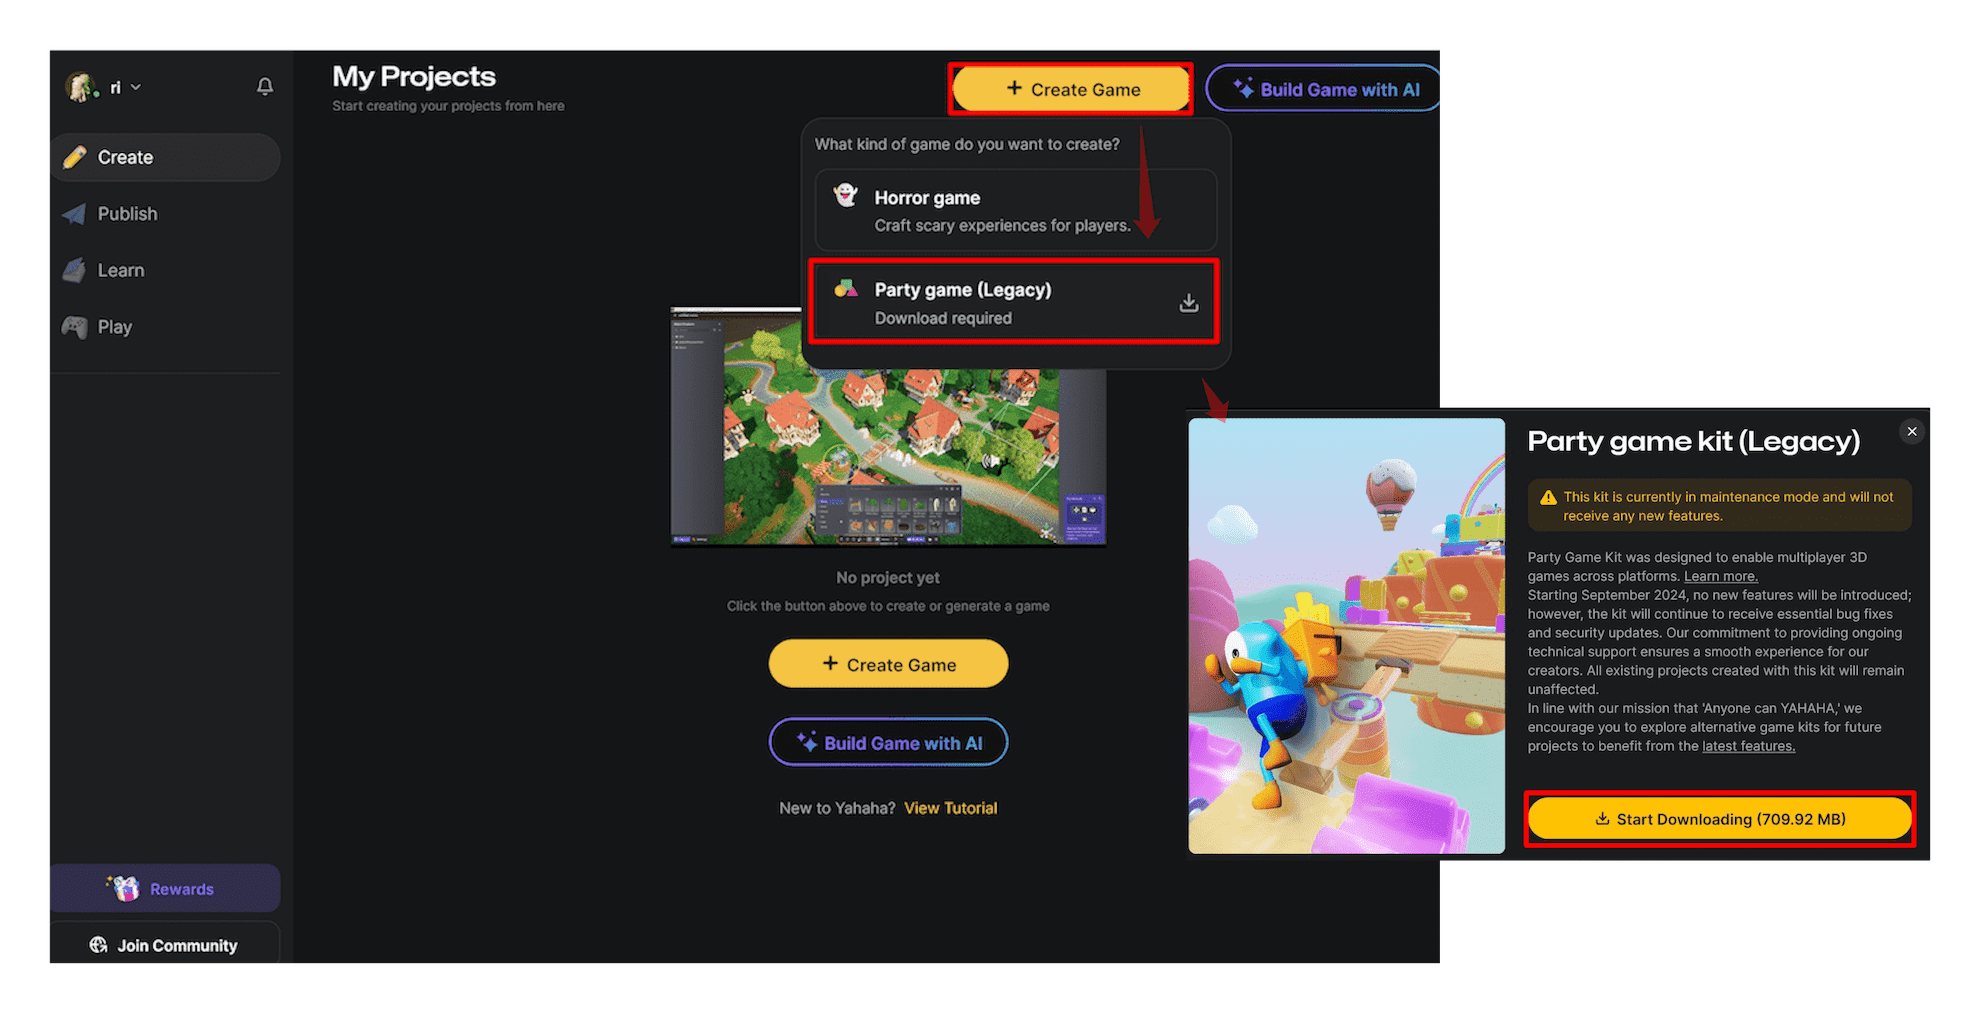
On the Create tab, select + Create Game > Party Game to start downloading Party Game Kit.
-
When the download finishes, there are four options for starting a new party project.
- Base template includes minimal environment to build from scratch.
- Art templates create a project with ready-made assets in set-up scenes.
- Gameplay frameworks include complete scenery and gameplay functionality.
- Generative AI creates a game scene or story based on user prompts. To learn more, see AI assistant.
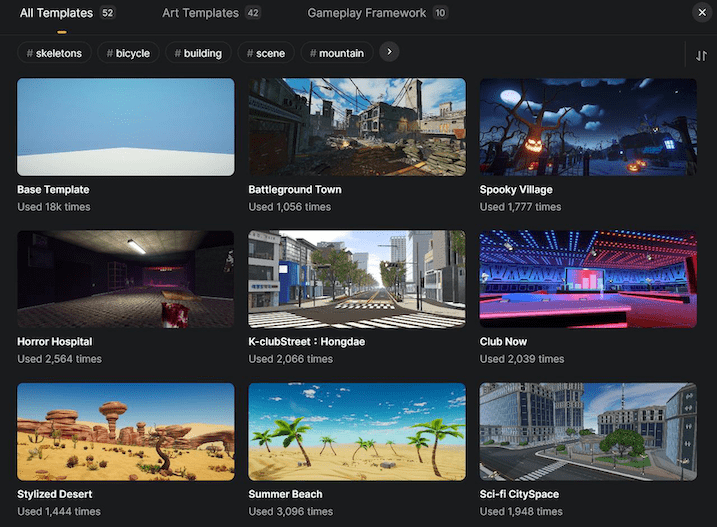 | 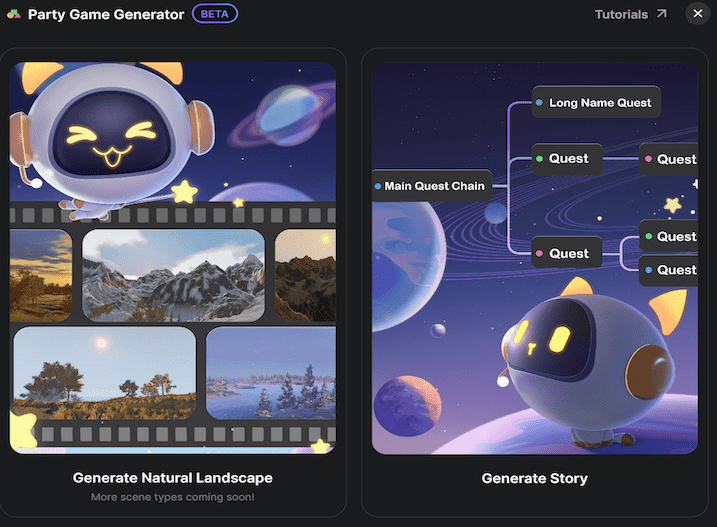 |
| Create from + Create Game > Party game | Create from Build Game with AI > Party game |
Once created, the project will open in YAHAHA Studio (Studio), the editor to design your game world.
Key areas of Studio interface
Studio layout is organized around the most important windows. Let's start reviewing them with five key areas of the basic editor interface.
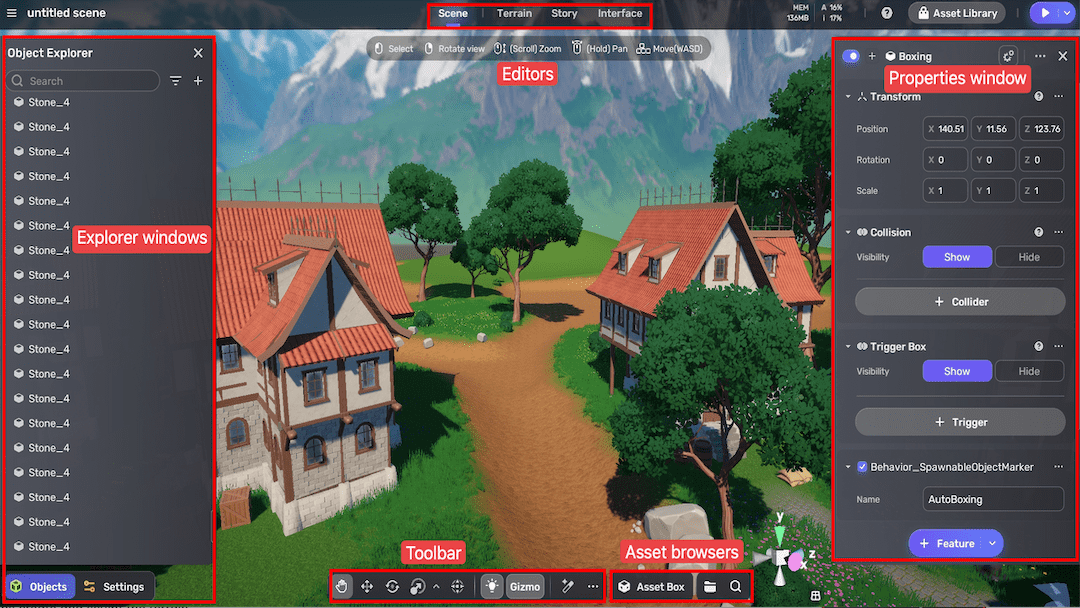 Studio interface
Scene, Terrain, Story, and Interface Editor
At the center of the Studio layout are four main editors—your interactive windows into the world you're creating:
- Scene Editor: Use this to manipulate objects and view your scene from multiple angles. By default, at least one YahahaObject named Respawn points is present, serving as the player's spawn location.
- Terrain Editor: Sculpt and modify terrain features to shape your world's landscape.
- Story Editor: Use generative AI to build quests and create branching storylines for your game.
- Interface Editor: Design and customize user interface (UI) elements for your project.
Scene navigation controls
When working in Studio, it's important to adjust the view and navigate the scene. To do so, use the following controls:
- Use the left mouse button to select a YahahaObject and press F to focus.
- Hold the right mouse button to rotate the view.
- Use the scroll wheel to move the view closer or further away.
- Hold the middle mouse button to pan the view.
- Use WASD to move the view left/right/forward/backward.
- Use Q and E to move the view up and down.
- Press Shift to move faster.
Explorer windows
The Object Explorer window lets you organize all the things in your project. All things that appear in the window are called YahahaObjects. Use the Explorer to select, group, and manage objects within your scene for efficient editing and navigation.
This Settings Explorer window serves as a central hub for designing and editing key game elements. From this Explorer, you can create and configure items, quests, and dialogues. It also lets you adjust environment settings, camera controls, game modes, character properties, and more.
Properties window
The Properties window is where you'll find and configure detailed information about YahahaObjects. When you select a YahahaObject and click the More icon in the top right corner, you'll see its components in this window. Components describe the properties and behaviors of YahahaObjects.
Asset browsers
Asset Box is where you can find all the assets available for use in your project, including those added from Asset Library and those automatically included for your convenience.
My Resources is where you find your all your imported assets from Unity, local paths, and your own creations. It also includes a gameplay library for creating and managing gameplay elements such as items, equipment, and vehicles.
Use the Search button to quickly locate assets across both Asset Box and My Resources by entering keywords or asset names.
Toolbar
Use the toolbar buttons to manipulate all YahahaObejects, for example, to grab, move, rotate, scale your selected YahahaObject, or align it along one or more axes. For more information, see Manipulating a YahahaObject.
Playtest
In the top-right corner, click the Play icon to playtest your game in Play Mode. This mode lets you enter a live simulation where you control your character and experience the game world as players will.
To test multiplayer gameplay, click the down arrow to switch to Test Mode, and click the
gear icon to test. This will open a separate launcher window for each avatar, so you can see how multiple players behave and interact within the game environment.
It's best practice to playtest your experience often to ensure everything works as expected and save your progress regularly.
Add assets to an existing project
Assets from Asset Library
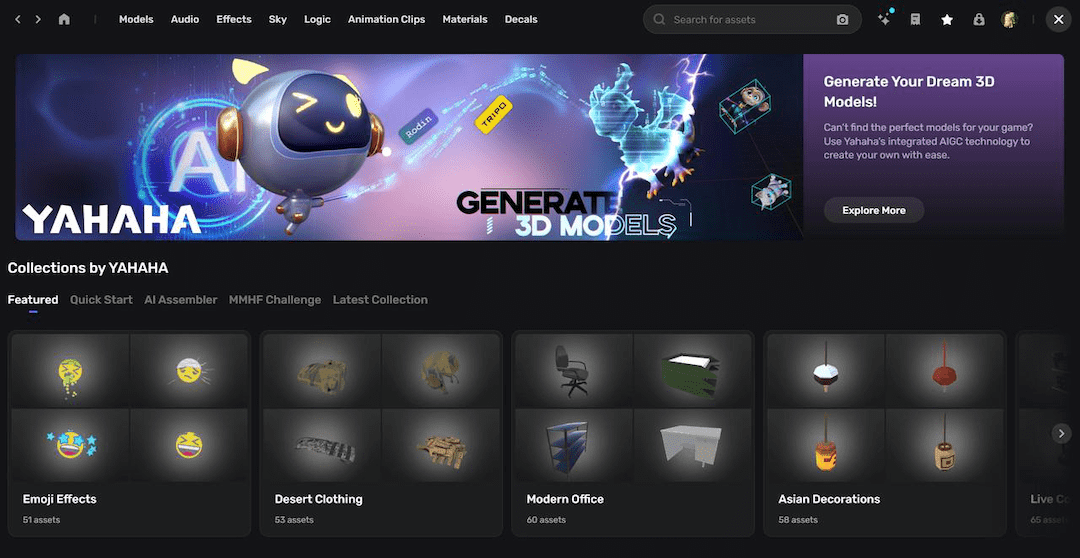
Yahaha's Asset Library offers a vast selection of free and commercial assets created by the YAHAHA team and community members. You can easily find what you need to build an amazing scene by browsing categories such as Models, Audio, Effects, Sky, Logic, Animation Clips, Materials, and Decals, or by entering keywords in the search bar.
To add an asset to your scene:
-
Click
to go to Asset Library.
-
Find an asset and hover over it, then click View in Scene to add it to the scene.
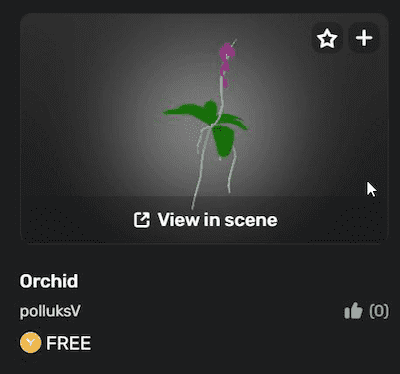
Or click
to save it first. After saving, locate the asset in Asset Box and double-click to add it to the scene.
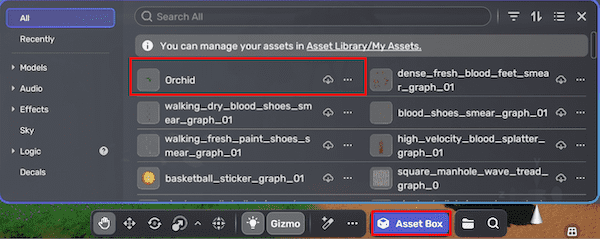
With the asset in the scene, you can adjust its attributes in the Properties window. For example, adjust its size by modifying the X, Y, and Z dimensions, and set its position by editing the corresponding coordinates. Or you can use the editing tools like Scale and Grab to achieve the same result.
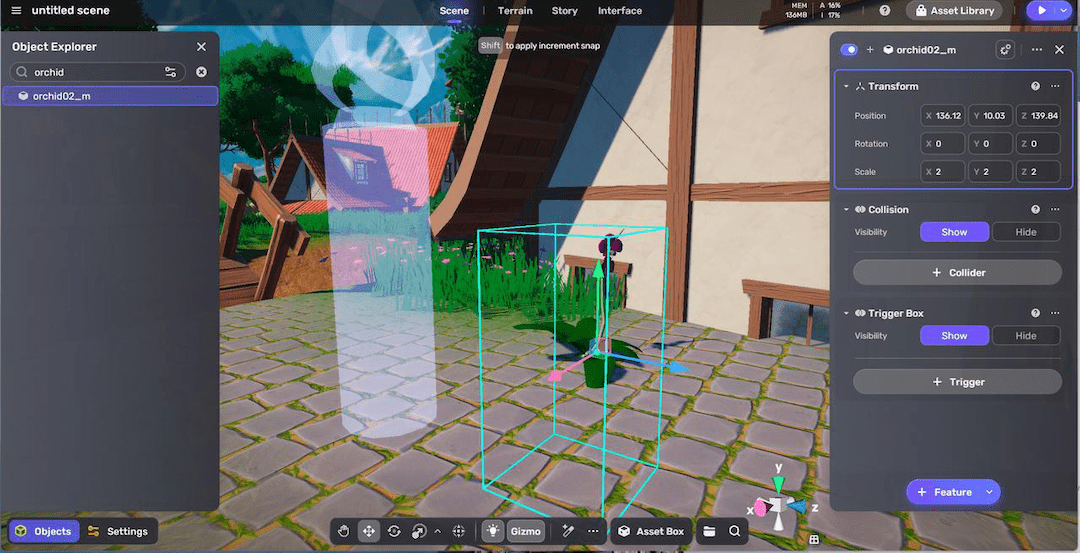
Assets created from scratch
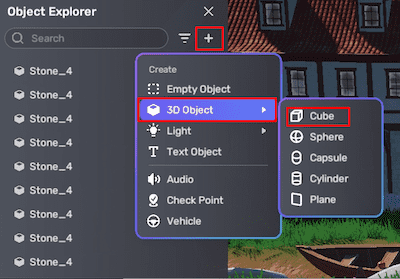
To create an object from scratch, click + in Object Explorer and select a 3D object, such as a cube.
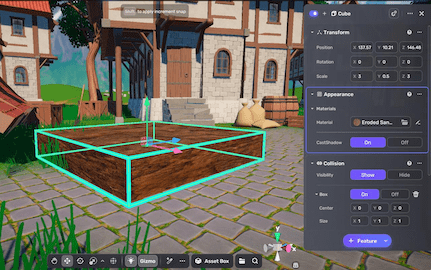
For example, increasing its size in X and Z dimensions to 3, and decreasing the Y dimension to 0.5 creates a 3x3 plane. If you change its material to a rock, you turn the plane into a rugged, rocky ground surface.
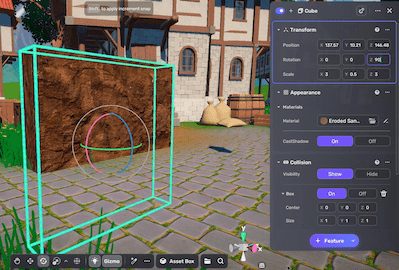
If you rotate it by 90 degrees on the Z axis, you convert a plane to a wall.
Assets from external sources
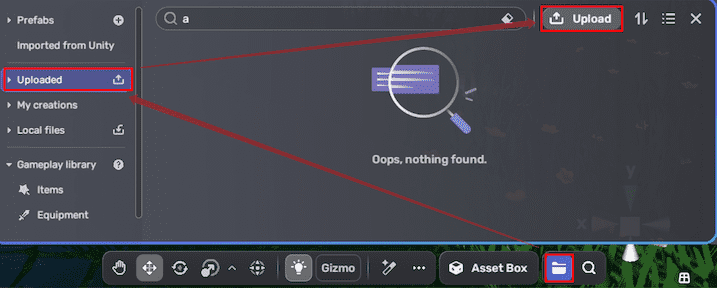
To import your assets into Studio, go to My Resources > Uploaded, and click the Upload button to get started. For more information, see External Assets.
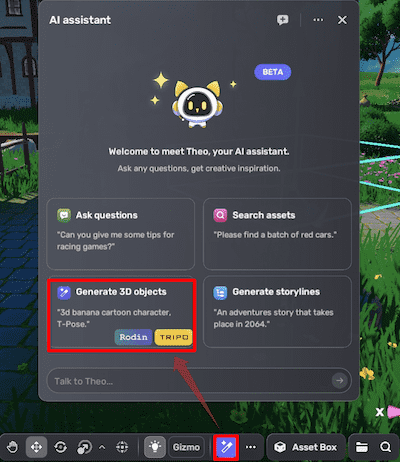
If you want to generate a 3D model with AI, find Yahaha's generative AI assistant on the toolbar and select Generate 3D objects to get started. See Generate 3D models for details.
Create an NPC and attach a dialogue to it
Make an NPC
Now that you know how to add models from Asset Library to your scene, let's add a character model and turn it into an NPC.
- Find and add a character model in Asset Library to the scene. Character models are categorized into different types such as Humanoids, Animals, Creatures, and Mechanical.
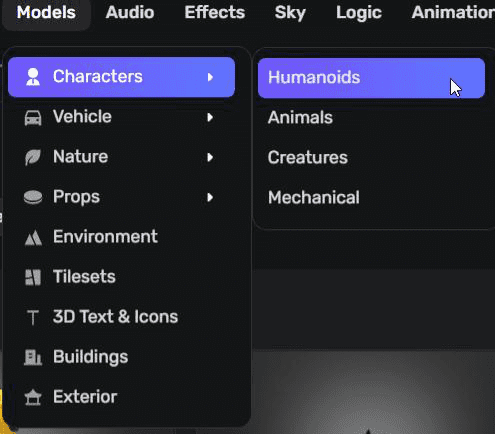
 Most character models are rigged in Asset Library. A rigged model is a 3D model with a built-in digital skeleton that allows it to move and be animated. There are two common rig types:
- Humanoid rigs, which mimic human skeletons and movements.
- Generic rigs, used for non-humanoid objects like treasure chests, vehicles, or mechanical models. A rigged model can only be animated if the animation clips used are compatible with its rig type.
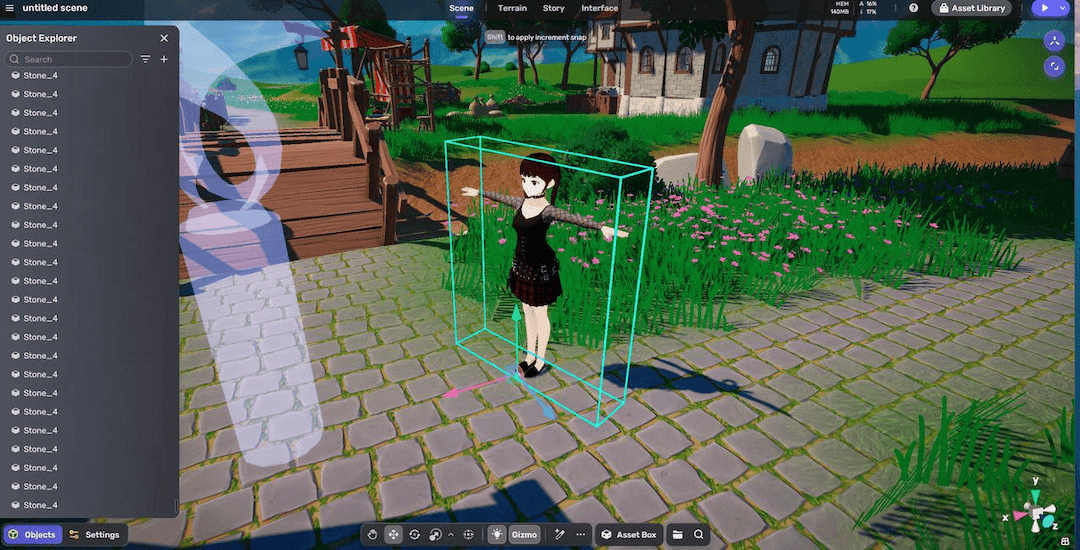
The tutorial uses a rigged, humanoid model named Cutyty.
-
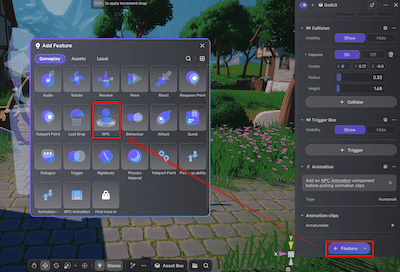
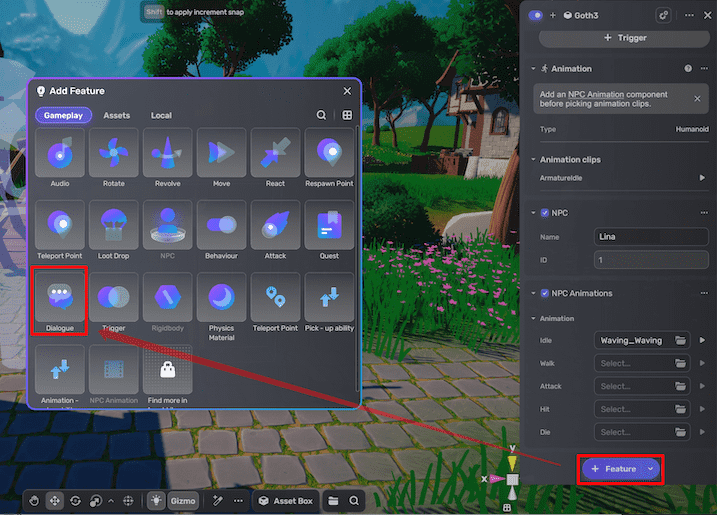
To make the model interactive, select it and add an NPC component by clicking + Feature > NPC.
-
Enter a name for the NPC (this will show in-game). The system automatically assigns an ID, which you will need if you do scripting.
-
(Optional) Since
Cutytyis a rigged humanoid model, to animate it: -
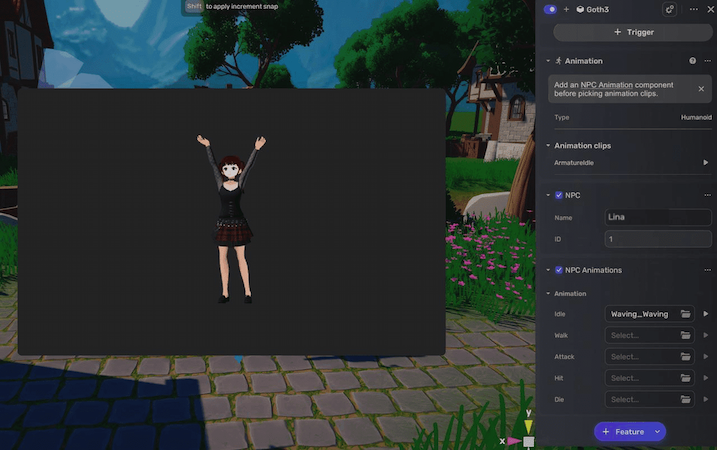
Add an NPC Animation component by selecting + Feature > NPC Animation.
-
Add humanoid animation clips from Asset Library and specify the animations at least for the Idle state.
Create a dialogue
-
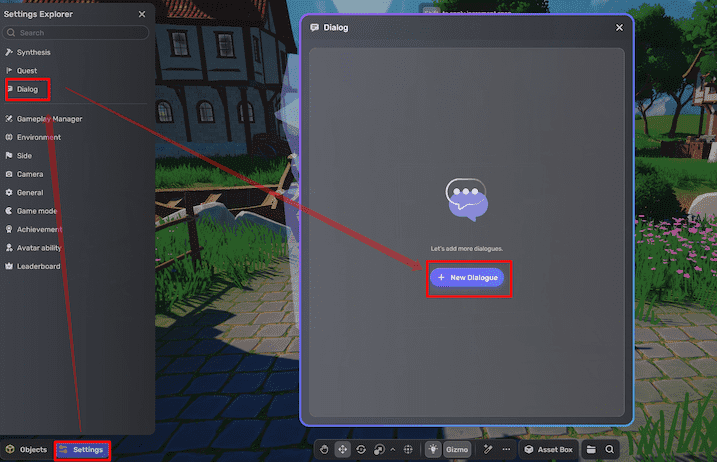
Go to Settings Explorer, click Dialog and select + New Dialogue. This action allows you to create a new dialogue entry in the Dialog window.
-
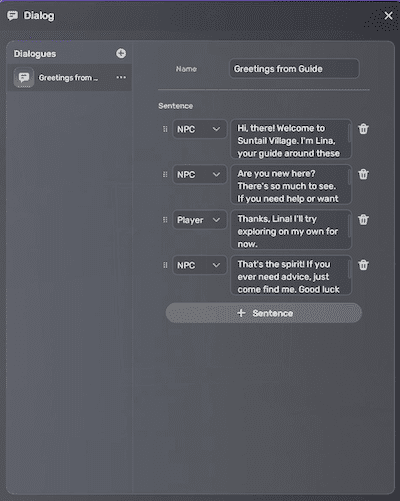
Fill in dialogue fields:
-
Name: The name of the dialogue. The name is the first text that a player sees when the conversation is activated.
-
Sentence: Sentences that speakers say during the conversation. You can add as many sentences as you like.
-
NPC/Player: Specify whether the speaker is an NPC or a player. You can create a consecutive conversation with it.
-
Text: The content of the sentence.
-
-
(Optional) If you want to create more dialogues, click
next to Dialogues to add and complete a new dialogue entry.
Attach the dialogue to the NPC
-
Select the model and add a Dialogue component to it by selecting +Feature > Dialogue.
-
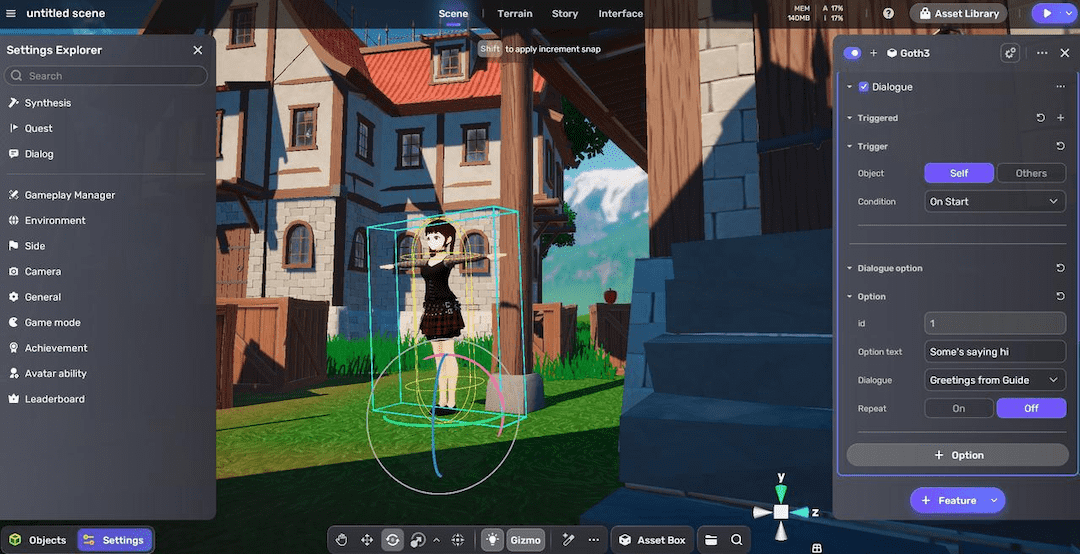
Configure the dialogue's triggers and content:
-
In the Dialogue Trigger, the trigger defaults to Self On start. This means the conversation will begin automatically when the game starts.
-
In the Dialogue option, select the dialogue from the dialogue pool. You can name the dialogue and make it one-off instead of repetitive.
Control environmental lighting and effects using the Environment system
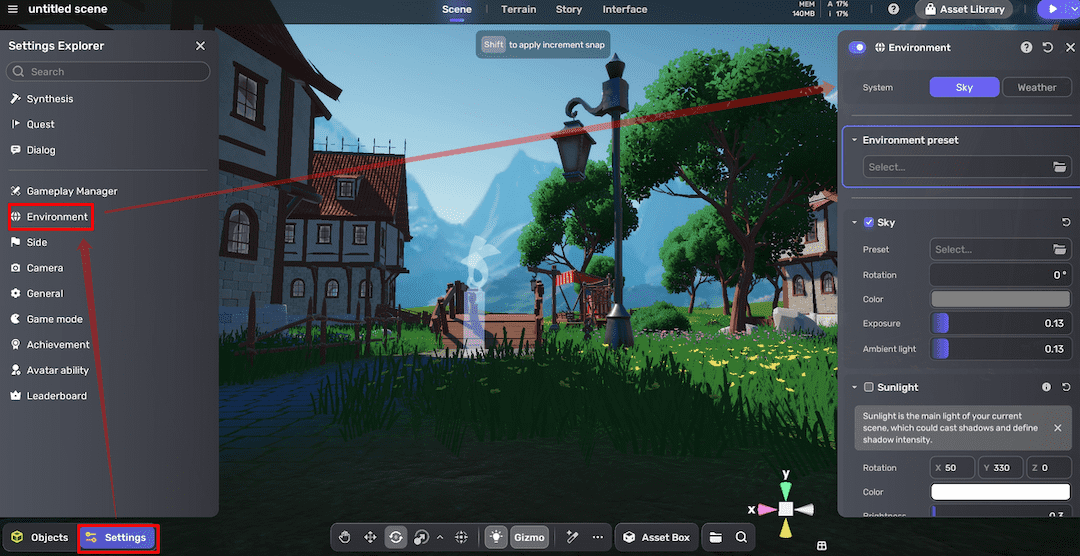
The Environment system enables fast control over the sky (skybox), sunlight, and post-processing effects of a scene.
- In Settings Explorer, click Environment. The Environment properties window will appear on the right hand.
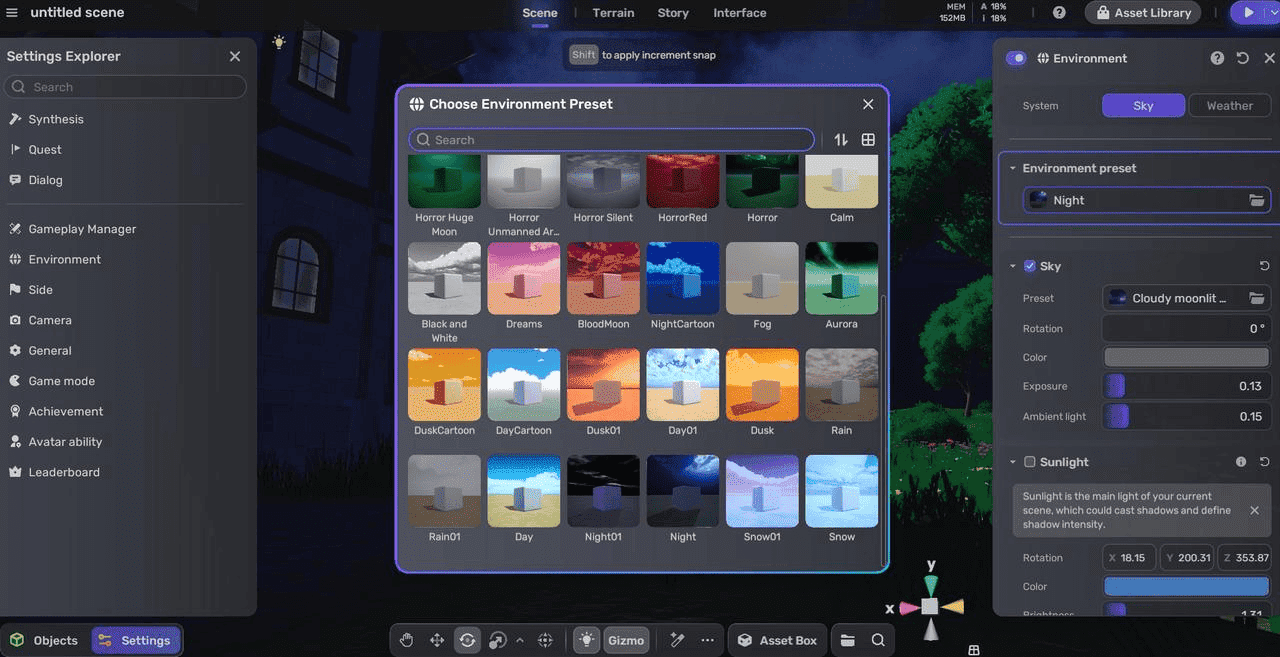
- To quickly change the environment, you can set Environment preset to Night to view the contrast change in the skybox, sunlight and post-processings.
To learn more about environment settings, see Environment.
Playtest a project
-
In Settings Explorer, go to Game mode and set Type to Adventure.
-
Enter Play Mode to see if the dialogue starts in the new environment.
Save a project
Save the project by clicking the Menu icon and selecting Save, or just press Ctrl + S.
Publish a project
-
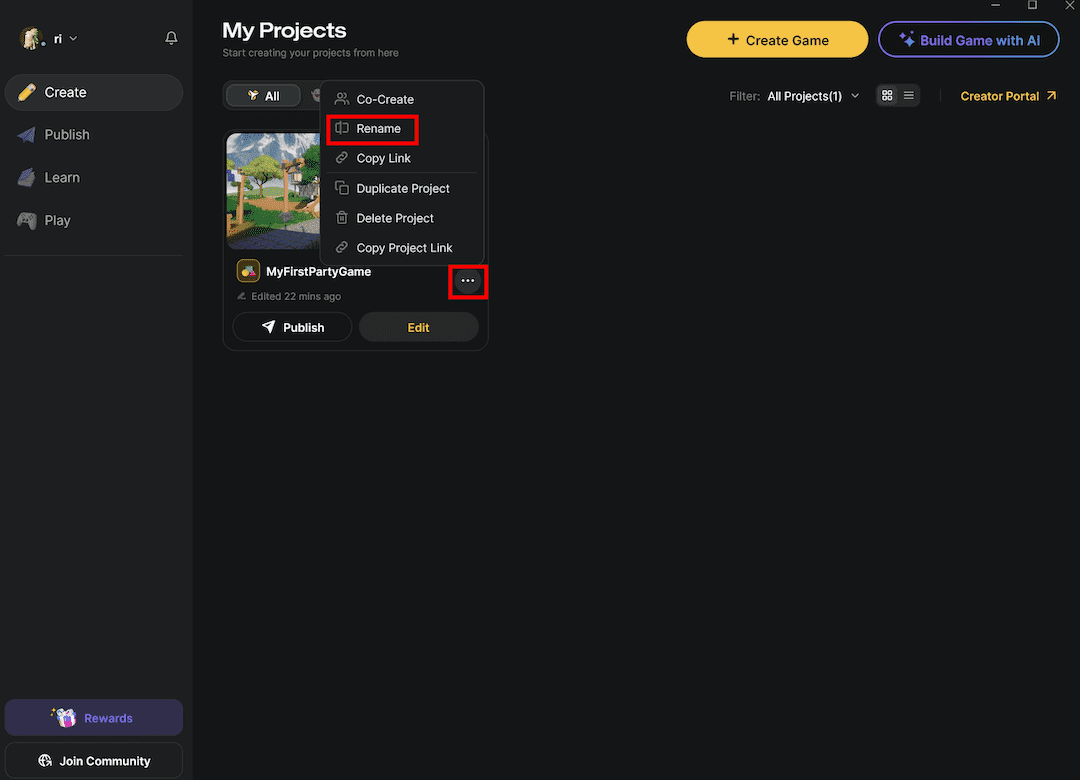
Open Desktop, on the Create tab find your project and rename it.
-
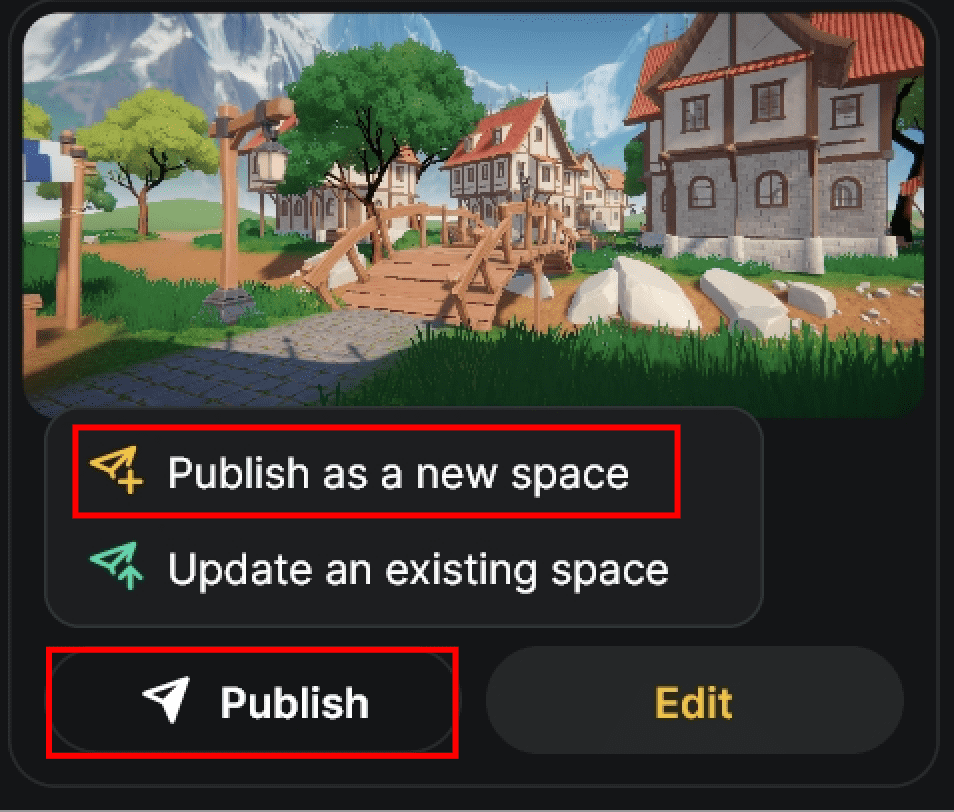
Click the Publish button under the project card and choose Publish as a new space.
-
Fill out the game information, then click Publish to publish:
- Space name: The name of the project.
- Max Players: The maximum number of players allowed, between 1 and 30.
- Screenshots: The screenshot(s) of the project. Between 1 and 10 screenshots can be added with a resolution higher than 1440X648.
- Loading images: An image cover for the project with a resolution higher than 1218X563. No more than 5 tags can be added.
- Tags: The tag(s) of the project. No more than 5 tags can be added and special characters are not allowed in the tags.
- Loading tips: Customizable tip(s) displayed to users upon loading the project. You can add up to five tips, with each tip having a maximum character limit of 100.
- Description: A brief description of the project, between 0 and 500 words.
-
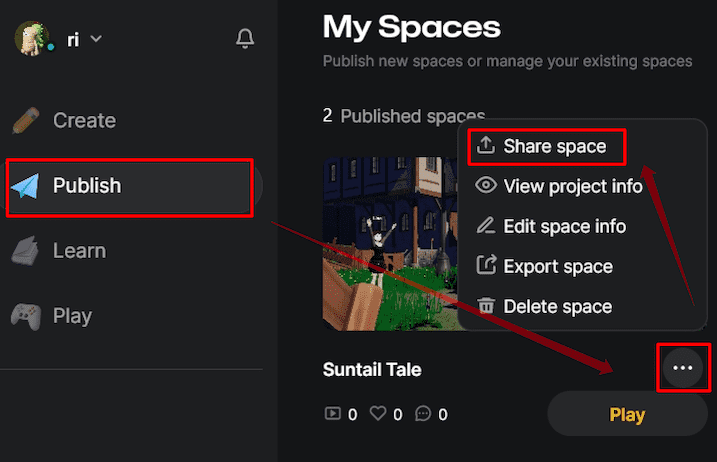
After publishing, go to the Publish tab to find your project. You can also hover over it, click
, and select Share space to copy the link and easily share it with your friends.
FAQ
Q1: Is Party Game Kit only for party games?
A: No, Party Game Kit can be used for various game types beyond party games. You can select kits in YAHAHA Desktop based on different gameplay styles and perspectives.
Q2: How do I choose between the two kits (Party Game Kit vs Horror Game Kit)?
A: You can consider these key factors:
- Horror Game Kit is ideal for single-player, first-person perspective games with atmospheric storytelling.
- Party Game Kit targets multiplayer games with third-person perspectives.
Q3: How does the AI 3D scene creation differ between kits?
A: Each kit has a different visual and environmental style bias:
- Party Game Kit leans towards bright, beautiful natural landscapes.
- Horror Game Kit suits darker, indoor, and eerie house environments. Art styles can be further customized within the scene regardless of the kit.
Q4: Are there differences in the predefined logic of the kits?
A: Yes. The kits have unique preset gameplay mechanics:
- The Party Kit includes many interactive mechanisms, perfect for beginners to create 3D platform or jumping games.
- The Horror Kit includes cutscenes, jumpscares, puzzle-solving mechanics suitable for narrative-driven 3D puzzle games, ideal for your next project after mastering basics.
Troubleshooting tips
Installation and setup issues
If YAHAHA Desktop or Studio fails to launch or crashes:
- Ensure you have installed the latest version (Desktop v1.3.34 or later).
- Check your internet connection is stable during downloads.
- If issues persist, contact us for support.
NPCs and dialogue issues
If NPCs don't speak or dialogues fail to trigger:
- Confirm NPC models have the NPC and Dialogue components attached.
- Check that dialogues are fully filled with sentences and linked correctly in Dialogue Options.
- Verify trigger types ("On start”) match your design. If you choose a trigger type that requires trigger box, ensure trigger boxes are added to detect interaction.
Publishing and sharing problems
If publishing project fails or project does not show correctly:
- Ensure all project details (name, tags, screenshots, loading images) meet formatting and resolution requirements.
- Confirm you are logged in and have a stable network connection.
- If you have imported assets, make sure the cloud build process is complete before publishing.
- Try publishing again after restarting Desktop.