Creating a 60-second countdown triggered by door opening
This tutorial is intended for Horror Game Kit users.
Overview
This tutorial guides you through creating a 60-second countdown timer that starts automatically when a door in your scene is opened. The timer will display on the UI and count down to zero, triggering any subsequent game events you desire.
Prerequisites
- Familiarity with Horror Game Kit, especially the Event Trigger component and scripting.
- Prepare a countdown timer UI asset in ZIP or Bytes format. This tutorial uses a Bytes file named
Timer_fui.bytesand you can click it to download.
Step 1: Set up the scene
-
Create a new project using the Start from Scratch template.
-
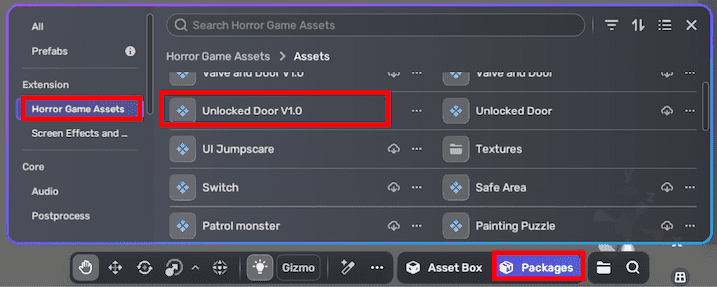
Add the Unlocked Door V1.0 smart asset to your scene to the scene by choosing Packages > Horror Game Assets > Unlocked Door V1.0. This smart asset includes a door model with built-in trigger logic to detect when the door is opened or closed.
-
Adjust the door's position and rotation as needed.
Most doors in AI-generated scenes already include this component.
Step 2: Import the timer UI asset
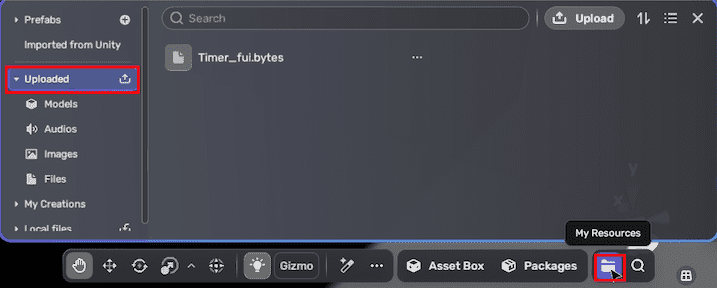
Before scripting the countdown logic, upload the timer UI asset by going to My Resources > Uploaded, and clicking the Upload button to select and upload the UI file from the local device.
Step 3: Configure the trigger event
-
In Scene Explorer, add an empty object from Create > Empty Object to your scene and rename it Game Start Event.
-
Add the Custom Event Notifier component from Add Components > Event Trigger to the empty object. This component will send a custom event when triggered.
-
Add an event trigger to the empty object by choosing Add Event Trigger. Configure it as follows:
- Trigger Object: Set to the door asset.
- Trigger Event: Set to OnOpened.
- Action Object: Set to Self (the Game Start Event object).
- Action Function: Set to NotifyCustomEventNow. This setup ensures that when the door opens, a custom event is fired.

Step 4: Script the countdown timer logic
- Add a new empty object to the scene and rename it Countdown.
- In the object's Properties window, add a new script to the object by choosing Add scripts.
- In the
Countdown.editor.lua, define the new fields on the Properties window:
local fieldDefs = {
    {
        name = "triggerEventObject",
        type = "GameObject"
    },
    {
        name = "seconds",
        type = "integer",
        default = 60,
        extendedProperties = {
            min = 1
        }
    },
    {
        name = "UIPackage",
        label = "UI Package",
        type = "File",
        extendedProperties = {
            includeTypes = {"bytes"}
        }
    },
}
script.DefineFields(fieldDefs)
triggerEventObject: The object that triggers the countdown (the Game Start Event).seconds: Duration of the countdown (default 60 seconds).UIPackage: The UI asset package for the timer display.
- In the
Countdown.lua, implement the runtime logic as follows:
local initialTotalSeconds = script.fields.seconds
local currentTotalSeconds = initialTotalSeconds
local showCountdown = false
local countdownRunning = false
local timerView

local function GetMinutesSeconds(totalSeconds)
    local minutes = math.floor(totalSeconds / 60)
    local seconds = math.ceil(totalSeconds - minutes * 60)
    if seconds == 60 then
        seconds = 0
        minutes = minutes + 1
    end
    return minutes, seconds
end

local function ShowTimerUI()
    -- Show Timer UI here
    -- Mount the component object to the GRoot (so that it's on stage)
    if timerView then
        GRoot.inst:AddChild(timerView)
        timerView.size = GRoot.inst.size
        timerView:AddRelation(GRoot.inst, RelationType.Size)
    end
end

local function RefreshTimerUI()
    local minutes, seconds = GetMinutesSeconds(currentTotalSeconds)
    -- Refresh UI content here
    local minutesStr
    if minutes < 10 then
        minutesStr = "0" .. tostring(minutes)
    else
        minutesStr = tostring(minutes)
    end

    local secStr
    if seconds < 10 then
        secStr = "0" .. tostring(seconds)
    else
        secStr = tostring(seconds)
    end
    -- If you are not familiar with UI, you can log the time with print function
    print("Countdown " .. tostring(minutesStr) .. ":" .. tostring(secStr))

    if timerView then
        timerView:GetChild("Minutes").text = minutesStr
        timerView:GetChild("Seconds").text = secStr
    end
end

local function HideTimerUI()
    -- Hide Timer UI here
    if timerView then
        GRoot.inst:RemoveChild(timerView)
    end
end

script.OnStart(function ()
    -- Load FairyGUI package
    YaUIPackage.AddCustomPackage(script.fields.UIPackage, function(path, package, packageItem)
        local number = string.match(path, "(%d+).png$")
        local index = number and tonumber(number) + 1
        if index and script.fields.atlas[index] then
            package:SetItemAsset(packageItem, script.fields.atlas[index], FairyGUI.DestroyMethod.None)
        end
    end)

    -- create component
    timerView = UIPackage.CreateObject("Timer", "Main")
end)

script.OnUpdate(function ()
    if not countdownRunning then
        return
    end
    local deltaTime = UnityEngine.Time.deltaTime
    local currentTotalSecondsBefore = currentTotalSeconds
    currentTotalSeconds = currentTotalSeconds - deltaTime
    if currentTotalSeconds <= 0 then
        -- Countdown hit the deadline
        showCountdown = false
        countdownRunning = false
        HideTimerUI()
        if script.fields.notifyEventObject then
            yahaha.EventSystem:NotifyObjectEvent(script.fields.notifyEventObject, "com.yahaha.sdk.trigger.CustomEvent")
        end
        return
    end

    local needRefresh = math.ceil(currentTotalSecondsBefore) ~= math.ceil(currentTotalSeconds)
    if needRefresh then
        RefreshTimerUI()
    end
end)

function StartCountdown()
    if showCountdown then
        return
    end

    currentTotalSeconds = initialTotalSeconds
    showCountdown = true
    countdownRunning = true
    ShowTimerUI()
    RefreshTimerUI()
end

function PauseCountdown()
    if not showCountdown then
        return
    end
    countdownRunning = false
end

function ResumeCountdown()
    if not showCountdown then
        return
    end
    countdownRunning = true
end

local eventObject = script.fields.triggerEventObject
local callback = function ()
    StartCountdown()
end
if eventObject then
    yahaha.EventSystem:RegisterObjectEvent(eventObject, "com.yahaha.sdk.trigger.CustomEvent", callback)
end

script.OnDispose(function()
    yahaha.EventSystem:UnregisterObjectEvent(eventObject, "com.yahaha.sdk.trigger.CustomEvent", callback)
    if timerView then
        GRoot.inst:RemoveChild(timerView)
        timerView:Dispose()
    end
    YaUIPackage.RemovePackage(script.fields.UIPackage)
end)
Key functions in the script:
GetMinutesSeconds: Converts a total number of seconds into separate minutes and seconds values for display purposes.ShowTimerUI: Adds the timer UI component to the screen by attaching the pre-createdGComponentto theGRoot, making the timer visible.RefreshTimerUI: Updates the timer UI with the current countdown time. It retrieves twoGTextFieldcomponents representing minutes and seconds, then updates their displayed values based on the current time.HideTimerUI: Removes the timer UI from the screen by detaching theGComponentfrom theGRoot, effectively hiding the timer.- In the callback function registered with
script.OnUpdate,UnityEngine.Time.deltaTimeis used to obtain the time elapsed since the last frame. This elapsed time is added tocurrentTotalSeconds, andRefreshTimerUIis called as needed to update the UI. WhencurrentTotalSecondsdrops below zero, it indicates that the countdown has finished. StartCountdown: Initiates the countdown timer. The function first checks theshowCountdownflag; if the countdown is already displayed, it exits early. Otherwise, it initializes currentTotalSeconds, sets bothshowCountdownandcountdownRunningtotrue, and calls the UI control functions to display the countdown.PauseCountdown: Pauses the countdown timer. This function only operates if the countdown is currently running, so it first verifies thatshowCountdownistrue.ResumeCountdown: Resumes the countdown timer. LikePauseCountdown, it only works if the countdown is active, so it checks thatshowCountdownistruebefore proceeding.
Step 5: Finalize countdown settings
In the Properties window of the Countdown object, make sure the scripted fields are filled in as follows:

- Trigger Event Object: the Game Start Event object.
- seconds: the desired countdown length (default 60).
- UIPackage: The uploaded timer UI asset.
Step 6: Playtest
Enter Play Mode and open the door. The countdown timer should appear and count down from 60 seconds to zero, updating every second.
Troubleshooting
- If events do not trigger:
- Check that the Custom Event Notifier is attached to the receiver object.
- Ensure the event name in your script matches the event configured in the Event Trigger.
- If no response or action:
- Verify that the Event Trigger is set up correctly and points to the right action (e.g., play audio).
- Make sure the referenced objects are correctly assigned in your script fields.
- If you encounter script errors or unexpected behavior:
- Use F12 to open the console for debug logs to confirm your script runs as expected.
- Double-check that all objects are active and available in the scene.